장 – 5
C 프로그래밍 소개
소개
'C'는 현대 컴퓨터 세계에서 가장 인기 있는 프로그래밍 언어 중 하나입니다. C 프로그래밍 언어는 1972년 벨 연구소의 브라이언 커니건과 데니스 리치가 설계하고 개발했습니다.
'C'는 프로그래머가 머신의 거의 모든 내부 구성 요소(레지스터, I/O 슬롯, 절대 주소)에 접근할 수 있도록 특별히 설계된 언어입니다. 동시에 'C'는 매우 복잡한 다중 프로그래밍 프로젝트도 체계적이고 시기적절하게 구축할 수 있도록 필요한 만큼의 데이터 처리와 프로그램된 텍스트의 모듈화를 허용합니다.
이 언어는 원래 UNIX에서 실행되도록 의도되었지만 IBM PC 및 호환 기종에서 MS-DOS 운영 체제에서 실행하려는 관심이 많았습니다. 이 언어는 표현의 단순성, 코드의 간결성, 광범위한 적용 범위로 인해 이러한 환경에 매우 적합합니다.
게다가 C 컴파일러는 작성이 간단하고 쉽기 때문에 일반적으로 마이크로컴퓨터, 미니컴퓨터, 메인프레임을 포함한 모든 새로운 컴퓨터에서 사용할 수 있는 최초의 고급 언어입니다.
데이터 복구 프로그래밍에 C를 사용하는 이유
오늘날의 컴퓨터 프로그래밍 세계에는 다양한 고급 언어가 존재합니다. 이러한 언어는 대부분의 프로그래밍 작업에 적합한 많은 기능을 갖추고 있어서 좋습니다. 그러나 데이터 복구 프로그래밍, 시스템 프로그래밍, 장치 프로그래밍 또는 하드웨어 프로그래밍을 하려는 프로그래머가 C를 첫 번째로 선택하는 데에는 몇 가지 이유가 있습니다.
- C는 전문 프로그래머들이 선호하는 인기 있는 언어이다. 그 결과, 다양한 C 컴파일러와 유용한 액세서리를 사용할 수 있습니다.
- C는 이식성이 있는 언어이다 . 한 컴퓨터 시스템에 맞춰 작성된 C 프로그램은 거의 또는 전혀 수정하지 않고도 다른 시스템에서 컴파일하고 실행할 수 있습니다. 이식성은 C 컴파일러에 대한 규칙 세트인 C용 ANSI 표준에 의해 개선되었습니다.
- C는 프로그래밍에서 모듈을 광범위하게 사용할 수 있도록 허용합니다. C 코드는 함수라고 불리는 서브루틴으로 작성될 수 있습니다. 이러한 기능은 다른 애플리케이션이나 프로그램에서 재사용될 수 있습니다. 새로운 애플리케이션을 프로그래밍할 때 이전에 다른 애플리케이션에서 개발한 것과 동일한 모듈을 만들기 위해 추가적인 노력을 기울일 필요는 없습니다.
이 기능은 아무런 변경 없이, 또는 약간의 변경만으로 새 프로그램에서 사용할 수 있습니다. 데이터 복구 프로그래밍의 경우, 다양한 프로그램의 여러 응용 프로그램에서 동일한 기능을 여러 번 실행해야 할 때 이러한 품질이 매우 유용하다는 것을 알게 될 것입니다.
- C는 강력하고 유연한 언어입니다. 이것이 C가 운영 체제, 워드 프로세서, 그래픽, 스프레드시트, 심지어 다른 언어의 컴파일러까지 다양한 프로젝트에 사용되는 이유입니다.
- C는 몇 개의 단어로 구성된 언어로, 키워드라고 불리는 몇 개의 용어만 포함하고 있으며, 이 키워드는 언어 기능의 기반이 됩니다. 이러한 키워드는 예약어라고도 하며, C 언어를 더욱 강력하게 만들고, 프로그래밍의 폭을 넓혀주며, 프로그래머가 C로 모든 유형의 프로그래밍을 할 수 있다고 느끼게 합니다.
당신은 C에 대해 아무것도 모른다고 가정해 보겠습니다.
당신은 C 프로그래밍에 대해 아무것도 모르고, 프로그래밍에 대해 전혀 모른다고 가정합니다. C 언어의 가장 기본적인 개념부터 시작해서 포인터, 구조체, 동적 메모리 할당과 같은 보통 어려운 개념을 포함한 고급 C 프로그래밍까지 안내해 드리겠습니다.
이러한 개념은 이해하기 쉽지 않지만 매우 강력한 도구이기 때문에 완전히 이해하려면 많은 시간과 노력이 필요합니다.
Программирование на языке C — это колоссальный актив в тех областях, где вам может понадобиться использовать язык ассемблера, но вы бы предпочли сохранить его простым для написания и поддержки. Время, сэкономленное при кодировании на языке C, может быть колоссальным в таких случаях.
Even though the C language enjoys a good record when programs are transported from one implementation to another, there are differences in compilers that you will find anytime you try to use another compiler.
Most of the differences become apparent when you use nonstandard extensions such as calls to the DOS BIOS when using MS-DOS, but even these differences can be minimized by careful choice of programming constructs.
When it became evident that the C programming language was becoming a very popular language available on a wide range of computers, a group of concerned individuals met to propose a standard set of rules for the use of the C programming language.
The group represented all sectors of the software industry and after many meetings, and many preliminary drafts, they finally wrote an acceptable standard for the C language. It has been accepted by the American National Standards Institute (ANSI), and by the International Standards Organization (ISO).
It is not forced upon any group or user, but since it is so widely accepted, it would be economic suicide for any compiler writer to refuse to conform to the standard.
The programs written in this book are primarily for use on an IBM-PC or compatible computer but can be used with any ANSI standard compiler since it conforms so closely to the ANSI standard.
Let us start
Before you can do anything in any language and start programming, you must know how to name an identifier. An identifier is used for any variable, function, data definition, etc. In the C programming language, an identifier is a combination of alphanumeric characters, the first being a letter of the alphabet or an underline, and the remaining being any letter of the alphabet, any numeric digit, or the underline.
Two rules must be kept in mind when naming identifiers.
- The case of alphabetic characters is significant. C is a case sensitive language. That means Recovery is different from recovery and rEcOveRY is different from both mentioned before.
- According to the ANSI-C standard, at least 31 significant characters can be used and will be considered significant by a conforming ANSI-C compiler. If more than 31 are used, all characters beyond the 31st may be ignored by any given compiler.
Keywords
There are 32 words defined as keywords in C. These have predefined uses and cannot be used for any other purpose in a C program. They are used by the compiler as an aid to compiling the program. They are always written in lower case. A complete list follows:
| auto |
break |
case |
char |
| const |
continue |
default |
do |
| double |
else |
enum |
extern |
| float |
for |
goto |
if |
| int |
long |
register |
return |
| short |
signed |
sizeof |
static |
| struct |
switch |
typedef |
union |
| unsigned |
void |
volatile |
while |
Here we see the magic of C. The wonderful collection of only 32 keywords gives a wide use in different applications. Any computer program has two entities to consider, the data, and the program. They are highly dependent on one another and careful planning of both lead to a well planned and well written program.
Let us begin with a simple C program:
/*  First Program to learn C */
          #include <stdio.h>
          void main()
            {
            printf("This is a C program\n"); // printing a message
            }
Though the program is very simple, a few points are worthy of note. Let us examine the above program. Everything that is inside /* and */ is considered a comment and will be ignored by the compiler. You should not include comments within other comments, so something like this is not allowed:
/* this is a /* comment */ inside a comment, which is wrong */
There is also a way of documentation that works within a line. By using // we can add small documentation within that line.
Every C program contains a function called main. This is the start point of the program. Every function should return a value. In this program the function main returns no return value therefore we have written void main. We could also write this program as:
/* First Program to learn C */
 #include <stdio.h>
          main()
            {
          printf("This is a C program\n"); // printing a message
            return 0;
            }
Both the program are same and perform the same task. The result of both the program will print the following output on the screen:
This is a C program
#include<stdio.h> allows the program to interact with the screen, keyboard and file system of your computer. You will find it at the beginning of almost every C program.
main() declares the start of the function, while the two curly brackets show the start and finish of the function. Curly brackets in C are used to group statements together as in a function, or in the body of a loop. Such a grouping is known as a compound statement or a block.
printf("This is a C program\n"); prints the words on the screen. The text to be printed is enclosed in double quotes. The \n at the end of the text tells the program to print a new line as part of the output. printf() function is used for monitor display of the output.
Most of the C programs are in lower case letters. You will usually find upper case letters used in preprocessor definitions which will be discussed later, or inside quotes as parts of character strings.
Compiling the program
Let the name of our program is CPROG.C. To enter and compile the C program, follow these steps:
- C 프로그램의 활성 디렉토리를 만들고 편집기를 시작합니다. 이를 위해 모든 텍스트 편집기를 사용할 수 있지만 Borland의 Turbo C++와 같은 대부분의 C 컴파일러에는 프로그램을 하나의 편리한 설정으로 입력, 컴파일 및 연결할 수 있는 통합 개발 환경(IDE)이 있습니다.
- 소스 코드를 작성하고 저장하세요. 파일 이름은 CPROG.C로 지정해야 합니다.
- CPROG.C를 컴파일하고 링크합니다. 컴파일러 매뉴얼에 지정된 적절한 명령을 실행합니다. 오류나 경고가 없다는 메시지가 표시되어야 합니다.
- 컴파일러 메시지를 확인하세요. 오류나 경고가 없다면 모든 것이 정상일 것입니다. 프로그램을 입력하는 데 오류가 있으면 컴파일러가 오류를 잡아서 오류 메시지를 표시합니다. 오류 메시지에 표시된 오류를 수정하세요.
- 첫 번째 C 프로그램이 이제 컴파일되어 실행할 준비가 되었습니다. CPROG라는 이름의 모든 파일을 나열한 디렉토리를 표시하면 다음과 같이 다른 확장자를 가진 네 개의 파일이 표시됩니다.
- CPROG.C, 소스 코드 파일
- CPROG.BAK는 편집기로 생성한 소스 파일의 백업 파일입니다.
- CPROG.OBJ에는 CPROG.C의 개체 코드가 포함되어 있습니다.
- CPROG.EXE는 CPROG.C를 컴파일하고 링크할 때 생성된 실행 프로그램
- CPROG.EXE를 실행하려면 cprog를 입력하기만 하면 됩니다. 이것은 C 프로그램입니다라는 메시지가 화면에 표시됩니다.
이제 다음 프로그램을 살펴보겠습니다.
/* C를 배우는 첫 번째 프로그램 */ // 1
            // 2
            #include <stdio.h> // 3
            // 4
            메인() // 5
            {
            // 6
            printf("이것은 C 프로그램입니다\n"); // 7
            // 8
            0을 반환합니다. // 9
            } // 10
이 프로그램을 컴파일하면 컴파일러는 다음과 유사한 메시지를 표시합니다.
cprog.c(8) : 오류: `;'이 필요합니다.
이 오류 메시지를 여러 부분으로 나누어 보겠습니다. cprog.c는 오류가 발견된 파일의 이름입니다. (8)은 오류가 발견된 줄 번호입니다. Error: `;' expected는 오류에 대한 설명입니다.
이 메시지는 매우 유익하며, CPROG.C의 8번째 줄에서 컴파일러가 세미콜론을 찾을 것으로 예상했지만 찾지 못했다는 것을 알려줍니다. 그러나 세미콜론이 실제로 7번째 줄에서 생략되었다는 것을 알고 있으므로 불일치가 있습니다.
컴파일러가 7번째 줄에서 세미콜론이 생략되었는데도 8번째 줄에서 오류를 보고하는 이유는 무엇일까요? 답은 C가 줄 사이의 줄바꿈과 같은 것을 신경 쓰지 않는다는 사실에 있습니다. printf() 문 뒤에 속하는 세미콜론은 다음 줄에 배치할 수 있었지만 그렇게 하면 실제로는 나쁜 프로그래밍이 될 것입니다.
8번째 줄에서 다음 명령(return)을 만난 후에야 컴파일러는 세미콜론이 빠졌다는 것을 확신합니다. 따라서 컴파일러는 오류가 8번째 줄에 있다고 보고합니다.
다양한 유형의 오류에는 여러 가지 가능성이 있을 수 있습니다. 링크 오류 메시지에 대해 논의해 보겠습니다. 링커 오류는 비교적 드물며 일반적으로 C 라이브러리 함수 이름을 잘못 철자하여 발생합니다. 이 경우 오류: 정의되지 않은 기호: 오류 메시지와 함께 철자가 틀린 이름이 표시됩니다. 철자를 수정하면 문제가 사라질 것입니다.
숫자 인쇄
다음 예를 살펴보겠습니다.
// 숫자를 인쇄하는 방법 //
            #include<stdio.h>
          void 메인()
            {
            정수 숫자 = 10;
          printf("숫자는 %d입니다", num);
          }
프로그램 출력은 다음과 같이 화면에 표시됩니다.
숫자는 10입니다
% 기호는 다양한 유형의 변수의 출력을 신호하는 데 사용됩니다. % 기호 뒤에 오는 문자는 ad로, 출력 루틴에 10진수 값을 가져와 출력하도록 신호를 보냅니다.
변수 사용
C에서 변수는 사용하기 전에 선언해야 합니다. 변수는 코드 블록의 시작 부분에서 선언할 수 있지만 대부분은 각 함수의 시작 부분에서 찾을 수 있습니다. 대부분의 로컬 변수는 함수가 호출될 때 생성되고 해당 함수에서 반환될 때 파괴됩니다.
C 프로그램에서 변수를 사용하려면 C에서 변수에 이름을 지정할 때 다음 규칙을 알아야 합니다.
- 이름에는 문자, 숫자, 밑줄(_)을 사용할 수 있습니다.
- 이름의 첫 글자는 반드시 문자여야 합니다. 밑줄도 합법적인 첫 글자이지만, 사용하지 않는 것이 좋습니다.
- C는 대소문자를 구분하므로 변수 이름 num은 Num과 다릅니다.
- C 키워드는 변수 이름으로 사용할 수 없습니다. 키워드는 C 언어의 일부인 단어입니다.
다음 목록에는 합법적이고 불법적인 C 변수 이름의 몇 가지 예가 나와 있습니다.
| 변수 이름 |
합법적인가 아닌가 |
| 에서 |
합법적인 |
| 티피티2_티피 |
합법적인 |
| 티티 포인트 |
불법: 공간이 허용되지 않습니다. |
| _1990_세금 |
합법적이지만 권장되지 않음 |
| 잭_폰# |
불법: 불법 문자 #을 포함합니다. |
| 사례 |
불법: C 키워드입니다 |
| 1권 |
불법: 첫 번째 문자가 숫자입니다. |
가장 먼저 눈에 띄는 새로운 것은 main() 본문의 첫 번째 줄입니다.
정수 숫자 = 10;
이 줄은 int 유형의 'num'이라는 변수를 정의하고 값 10으로 초기화합니다. 다음과 같이 작성할 수도 있습니다.
            int num; /* 초기화되지 않은 변수 'num' 정의 */
             /* 그리고 모든 변수 정의 뒤에: */
             num = 10; /* 변수 'num'에 값 10을 할당합니다. */
변수는 블록의 시작 부분(중괄호 {와} 사이)에서 정의될 수 있습니다. 이는 일반적으로 함수 본문의 시작 부분이지만, 다른 유형의 블록의 시작 부분일 수도 있습니다.
블록의 시작 부분에서 정의된 변수는 기본적으로 '자동' 상태로 설정됩니다. 즉, 블록 실행 중에만 존재합니다. 함수 실행이 시작되면 변수가 생성되지만 그 내용은 정의되지 않습니다. 함수가 반환되면 변수가 파괴됩니다. 정의는 다음과 같이 작성될 수도 있습니다.
자동 int num = 10;
Since the definition with or without the auto keyword is completely equivalent, the auto keyword is obviously rather redundant.
However, sometimes this is not what you want. Suppose you want a function to keep count of how many times it is called. If the variable would be destroyed every time the function returns, this would not be possible.
Therefore it is possible to give the variable what is called static duration, which means it will stay intact during the whole execution of the program. For example:
static int num = 10;
This initializes the variable num to 10 at the beginning of the program execution. From then on the value will remain untouched; the variable will not be re-initialized if the function is called multiple times.
Sometimes it is not sufficient that the variable will be accessible from one function only or it might not be convenient to pass the value via a parameter to all other functions that need it.
But if you need access to the variable from all the functions in the entire source file, this can also done with the static keyword, but by putting the definition outside all functions. For example:
              #include <stdio.h>
         static int num = 10; /* will be accessible from entire source file */
         int main(void)
            {
            printf("The Number Is: %d\n", num);
            return 0;
            }
And there are also cases where a variable needs to be accessible from the entire program, which may consist of several source files. This is called a global variable and should be avoided when it is not required.
This is also done by putting the definition outside all functions, but without using the static keyword:
            #include <stdio.h>
          int num = 10; /* will be accessible from entire program! */
          int main(void)
            {
            printf("The Number Is: %d\n", num);
            return 0;
            }
There is also the extern keyword, which is used for accessing global variables in other modules. There are also a few qualifiers that you can add to variable definitions. The most important of them is const. A variable that is defined as const may not be modified.
There are two more modifiers that are less commonly used. The volatile and register modifier. The volatile modifier requires the compiler to actually access the variable every time it is read. It may not optimize the variable by putting it in a register or so. This is mainly used for multithreading and interrupt processing purposes etc.
The register modifier requests the compiler to optimize the variable into a register. This is only possible with auto variables and in many cases the compiler can better select the variables to optimize into registers, so this keyword is obsolescent. The only direct consequence of making a variable register is that its address cannot be taken.
The table of variables, given in the next page describes the storage class of five type of storage classes.
표에서 우리는 키워드 extern이 두 행에 배치되어 있는 것을 볼 수 있습니다. extern 키워드는 함수에서 다른 곳에 정의된 정적 외부 변수를 선언하는 데 사용됩니다.
숫자형 변수 유형
C는 다양한 숫자 값에 따라 메모리 저장 요구 사항이 다르기 때문에 여러 가지 다른 유형의 숫자 변수를 제공합니다. 이러한 숫자 유형은 특정 수학 연산을 수행할 수 있는 용이성이 다릅니다.
작은 정수는 저장하는 데 메모리가 덜 필요하고, 컴퓨터는 이러한 숫자로 매우 빠르게 수학 연산을 수행할 수 있습니다. 큰 정수와 부동 소수점 값은 더 많은 저장 공간과 수학 연산에 더 많은 시간이 필요합니다. 적절한 변수 유형을 사용하면 프로그램이 가능한 한 효율적으로 실행되도록 할 수 있습니다.
C의 숫자형 변수는 다음 두 가지 주요 범주로 나뉩니다.
이러한 각 범주 내에는 두 개 이상의 특정 변수 유형이 있습니다. 다음에 주어진 표는 각 유형의 단일 변수를 보관하는 데 필요한 메모리 양을 바이트 단위로 보여줍니다.
char 유형은 signed char 또는 unsigned char와 동일할 수 있지만, 항상 이 두 유형과는 별개의 유형입니다.
C에서는 변수에 문자나 해당 숫자 값을 저장하는 데 차이가 없으므로 문자와 숫자 값 사이를 변환하거나 그 반대로 변환하는 함수도 필요 없습니다. 다른 정수 유형의 경우 signed 또는 unsigned를 생략하면 기본값이 signed가 되므로 예를 들어 int와 signed int는 동등합니다.
int 유형은 short 유형보다 크거나 같아야 하고, long 유형보다 작거나 같아야 합니다. 엄청나게 크지 않은 값을 저장하기만 하면 되는 경우 int 유형을 사용하는 것이 좋습니다. 일반적으로 프로세서가 가장 쉽게 처리할 수 있는 크기이므로 가장 빠릅니다.
여러 컴파일러에서 double과 long double은 동등합니다. 대부분의 표준 수학 함수가 double 유형으로 작동한다는 사실과 결합하면 분수로 작업해야 하는 경우 항상 double 유형을 사용해야 하는 좋은 이유가 됩니다.
다음 표는 변수 유형을 더 잘 설명합니다.

일반적으로 사용되는 특수 목적 유형:
| 변수 유형 |
설명 |
| 사이즈_t |
바이트 단위로 객체 크기를 저장하는 데 사용되는 부호 없는 유형 |
| 시간_t |
time() 함수의 결과를 저장하는 데 사용됩니다 |
| 시계_t |
clock() 함수의 결과를 저장하는 데 사용됩니다 |
| 파일 |
스트림(일반적으로 파일이나 장치)에 액세스하는 데 사용됨 |
| ptrdiff_t |
2개 포인터의 차이를 나타내는 부호형 |
| div_t |
div() 함수의 결과를 저장하는 데 사용됩니다 |
| ldiv_t |
ldiv() 함수의 결과를 저장하는 데 사용됩니다 |
| fpos_t |
파일 위치 정보를 보관하는 데 사용됨 |
| 의지 목록 |
가변 인수 처리에 사용됨 |
| wchar_t |
넓은 문자 유형(확장 문자 집합에 사용됨) |
| 시그_원자_t |
신호 처리기에서 사용됨 |
| jmp_buf 를 선택하세요 |
비로컬 점프에 사용됨 |
이러한 변수를 더 잘 이해하기 위해 예를 들어 보겠습니다.
/* C 변수의 범위와 크기를 바이트 단위로 알려주는 프로그램 */
            #include <stdio.h>
          int 메인()
            {
            int a; /* 간단한 정수형 */
            long int b; /* 긴 정수형 */
            short int c; /* 짧은 정수형 */
            unsigned int d; /* 부호 없는 정수형 */
            char e; /* 문자 유형 */
            float f; /* 부동 소수점 유형 */
            double g; /* 배정밀도 부동소수점 */
           a = 1023;
            b = 2222;
            c = 123;
            d = 1234;
            e = 'X';
            f = 3.14159;
            g = 3.1415926535898;
          printf( "\nA char는 %d바이트입니다", sizeof( char ));
            printf( "\nint는 %d바이트입니다", sizeof( int ));
            printf( "\nShort는 %d바이트입니다", sizeof(short));
            printf( "\nLong은 %d바이트입니다", sizeof(long));
            printf( "\n부호 없는 char는 %d바이트입니다",
            sizeof(unsigned char));
            printf( "\nUnsigned int는 %d바이트입니다",
            sizeof(unsigned int));
            printf( "\nUnsigned short는 %d바이트입니다",
            sizeof(unsigned short));
            printf( "\nUnsigned Long은 %d바이트입니다",
            sizeof(unsigned long));
            printf( "\nFloat는 %d바이트입니다", sizeof(float));
            printf( "\ndouble은 %d바이트입니다\n", sizeof(double));
            printf("a = %d\n", a); /* 10진수 출력 */
            printf("a = %o\n", a); /* 8진수 출력 */
            printf("a = %x\n", a); /* 16진수 출력 */
            printf("b = %ld\n", b); /* 10진수 긴 출력 */
            printf("c = %d\n", c); /* 10진수 짧은 출력 */
            printf("d = %u\n", d); /* 부호 없는 출력 */
            printf("e = %c\n", e); /* 문자 출력 */
            printf("f = %f\n", f); /* 부동 소수점 출력 */
            printf("g = %f\n", g); /* double float 출력 */
            printf("\n");
            printf("a = %d\n", a); /* 간단한 int 출력 */
            printf("a = %7d\n", a); /* 필드 너비를 7로 사용 */
            printf("a = %-7d\n", a); /* 왼쪽 정렬
            7의 필드 */
            c = 5;
            d = 8;
            printf("a = %*d\n", c, a); /* 5의 필드 너비를 사용합니다*/
            printf("a = %*d\n", d, a); /* 필드 너비를 8로 사용 */
            printf("\n");
            printf("f = %f\n", f); /* 간단한 float 출력 */
            printf("f = %12f\n", f); /* 필드 너비를 12로 사용 */
            printf("f = %12.3f\n", f); /* 소수점 3자리 사용 */
            printf("f = %12.5f\n", f); /* 소수점 5자리 사용 */
            printf("f = %-12.5f\n", f); /* 필드에서 왼쪽 정렬 */
            0을 반환합니다.
            }
프로그램 실행 후 결과는 다음과 같이 표시됩니다.
                           char는 1바이트입니다
                         int는 2바이트입니다
                         short는 2바이트입니다
                         long은 4바이트입니다
                         부호 없는 char는 1바이트입니다
                         unsigned int는 2바이트입니다
                         부호 없는 short는 2바이트입니다.
                         unsigned long은 4바이트입니다.
                         float는 4바이트입니다
                         double은 8바이트입니다
                            a = 1023
                            a = 1777
                            a = 3ff
                            비 = 2222
                            씨 = 123
                            디 = 1234
                            전자 = X
                            f = 3.141590
                            g = 3.141593
                            a = 1023
                            a = 1023
                            a = 1023
                            a = 1023
                            a = 1023
                            f = 3.141590
                            f = 3.141590
                            f = 3.142
                            f = 3.14159
f = 3.14159 |
C 프로그램에서 변수를 사용하기 전에 선언해야 합니다. 변수 선언은 컴파일러에게 변수의 이름과 유형을 알려주고, 선택적으로 변수를 특정 값으로 초기화합니다.
프로그램이 선언되지 않은 변수를 사용하려고 하면 컴파일러가 오류 메시지를 생성합니다. 변수 선언은 다음과 같은 형식을 갖습니다.
유형 이름 변수 이름;
typename은 변수 유형을 지정하며 키워드 중 하나여야 합니다. varname은 변수 이름입니다. 변수 이름을 쉼표로 구분하여 한 줄에 동일한 유형의 여러 변수를 선언할 수 있습니다.
int count, number, start; /* 세 개의 정수 변수 */
            float percent, total; /* 두 개의 float 변수 */
typedef 키워드
typedef 키워드는 기존 데이터 유형에 대한 새 이름을 만드는 데 사용됩니다. 실제로 typedef는 동의어를 만듭니다. 예를 들어, 다음 문장
typedef int 정수;
여기서 우리는 typedef가 int의 동의어로 정수를 생성하는 것을 봅니다. 그런 다음 이 예와 같이 정수를 사용하여 int 유형의 변수를 정의할 수 있습니다.
정수 개수;
따라서 typedef는 새로운 데이터 유형을 만들지 않고, 미리 정의된 데이터 유형에 다른 이름을 사용할 수 있도록만 합니다.
숫자 변수 초기화
변수가 선언되면 컴파일러는 변수에 대한 저장 공간을 따로 마련하라는 지시를 받습니다. 그러나 해당 공간에 저장된 값, 즉 변수의 값은 정의되지 않습니다. 0일 수도 있고, 무작위 "쓰레기" 값일 수도 있습니다. 변수를 사용하기 전에 항상 알려진 값으로 초기화해야 합니다. 다음 예를 들어보겠습니다.
int count; /* count를 위한 저장 공간을 따로 마련합니다. */
               count = 0; /* count에 0을 저장합니다. */
이 문장은 C의 할당 연산자인 등호(=)를 사용합니다. 변수를 선언할 때 초기화할 수도 있습니다. 그렇게 하려면 선언 문장에서 변수 이름 뒤에 등호와 원하는 초기값을 입력합니다.
int 카운트 = 0;
             이중 비율 = 0.01, 복잡도 = 28.5
허용 범위를 벗어난 값으로 변수를 초기화하지 않도록 주의하세요. 범위를 벗어난 초기화의 두 가지 예는 다음과 같습니다.
int 금액 = 100000;
             부호 없는 int 길이 = -2500;
C 컴파일러는 이러한 오류를 포착하지 못합니다. 프로그램은 컴파일되고 링크될 수 있지만, 프로그램을 실행할 때 예상치 못한 결과가 발생할 수 있습니다.
디스크의 총 섹터 수를 계산하려면 다음 예를 살펴보겠습니다.
// 디스크의 섹터를 계산하는 모델 프로그램 //
#include<stdio.h>
            #섹터당측량 63 정의
            #실린더당 측면 254 정의
             void 메인()
            {
             int 실린더=0;
            영어: clrscr();
            printf("디스크에 있는 실린더의 수를 입력하세요 \n\n\t");
            scanf("%d",&cylinder); // 사용자로부터 값을 가져옵니다. //
           printf("\n\n\t 디스크의 총 섹터 수 = %ld", (long)SECTOR_PER_SIDE*SIDE_PER_CYLINDER* 실린더);
            getch();
            }
프로그램의 출력은 다음과 같습니다.
디스크의 실린더 수를 입력하세요
                 1024
                 디스크의 총 섹터 수 = 16386048
이 예제에서 우리는 배울 수 있는 세 가지 새로운 것을 볼 수 있습니다. #define은 프로그램에서 기호 상수를 사용하거나 어떤 경우에는 긴 단어를 작은 기호로 정의하여 시간을 절약하는 데 사용됩니다.
여기서 우리는 프로그램을 이해하기 쉽게 하기 위해 SECTOR_PER_SIDE로 측면당 섹터 수 63을 정의했습니다. #define SIDE_PER_CYLINDER 254의 경우도 마찬가지입니다. scanf()는 사용자로부터 입력을 받는 데 사용됩니다.
여기서는 사용자로부터 실린더 개수를 입력으로 받습니다. *는 예에서와 같이 두 개 이상의 값을 곱하는 데 사용됩니다.
getch() 함수는 기본적으로 키보드에서 단일 문자 입력을 받습니다. 여기서 getch()를 입력하면 키보드에서 아무 키나 눌릴 때까지 화면을 멈춥니다.
운영자
연산자는 C가 하나 이상의 피연산자에 대해 어떤 연산이나 행동을 수행하도록 지시하는 기호입니다. 피연산자는 연산자가 작용하는 것입니다. C에서 모든 피연산자는 표현식입니다. C 연산자는 다음 네 가지 범주로 나뉩니다.
- 할당 연산자
- 수학 연산자
- 관계 연산자
- 논리 연산자
할당 연산자
할당 연산자는 등호(=)입니다. 프로그래밍에서 등호를 사용하는 것은 일반적인 수학적 대수 관계에서 사용하는 것과 다릅니다. 다음과 같이 쓰면
x = y;
C 프로그램에서는 "x가 y와 같다"는 의미가 아닙니다. 대신 "y의 값을 x에 할당한다"는 의미입니다. C 할당문에서 오른쪽은 어떤 표현식이든 될 수 있고 왼쪽은 변수 이름이어야 합니다. 따라서 형식은 다음과 같습니다.
변수 = 표현식;
실행 중에 표현식이 평가되고 결과 값이 변수에 할당됩니다.
수학 연산자
C's mathematical operators perform mathematical operations such as addition and subtraction. C has two unary mathematical operators and five binary mathematical operators. The unary mathematical operators are so named because they take a single operand. C has two unary mathematical operators.
The increment and decrement operators can be used only with variables, not with constants. The operation performed is to add one to or subtract one from the operand. In other words, the statements ++x; and --y; are the equivalents of these statements:
 x = x + 1;
             y = y - 1;
binary mathematical operators take two operands. The first four binary operators, which include the common mathematical operations found on a calculator (+, -, *, /), are familiar to you. The fifth operator Modulus returns the remainder when the first operand is divided by the second operand. For example, 11 modulus 4 equals 3 (11 is divided by 4, two times and 3 left over).
Relational Operators
C's relational operators are used to compare expressions. An expression containing a relational operator evaluates to either true (1) or false (0). C has six relational operators.
Logical Operators
Logical operators of C let you combine two or more relational expressions into a single expression that evaluates to either true or false. Logical operators evaluate to either true or false, depending on the true or false value of their operands.
If x is an integer variable, expressions using logical operators could be written in the following ways:
 (x > 1) && (x < 5)
             (x >= 2) && (x <= 4)
| Operator |
Symbol |
Description |
Example |
| Assignment operators |
| equal |
= |
assign the value of y to x |
x = y |
| Mathematical operators |
| Increment |
++ |
Increments the operand by one |
++x, x++ |
| Decrement |
-- |
Decrements the operand by one |
--x, x-- |
| Addition |
+ |
Adds two operands |
x + y |
| Subtraction |
- |
Subtracts the second operand from the first |
x - y |
| Multiplication |
* |
Multiplies two operands |
x * y |
| Division |
/ |
Divides the first operand by the second operand |
x / y |
| Modulus |
% |
Gives the remainder when the first operand is divided by the second operand |
x % y |
| Relational operators |
| Equal |
= = |
Equality |
x = = y |
| Greater than |
> |
Greater than |
x > y |
| Less than |
< |
Less than |
x < y |
| Greater than or equal to |
>= |
Greater than or equal to |
x >= y |
| Less than or equal to |
<= |
Less than or equal to |
x <= y |
| Not equal |
!= |
Not equal to |
x != y |
| Logical operators |
| AND |
&& |
True (1) only if both exp1 and exp2 are true; false (0) otherwise |
exp1 && exp2 |
| OR |
|| |
True (1) if either exp1 or exp2 is true; false (0) only if both are false |
exp1 || exp2 |
| NOT |
! |
False (0) if exp1 is true; true (1) if exp1 is false |
!exp1 |
Things to remember about logical expressions
| x * = y |
is same as |
x = x * y |
| y - = z + 1 |
is same as |
y = y - z + 1 |
| a / = b |
is same as |
a = a / b |
| x + = y / 8 |
is same as |
x = x + y / 8 |
| y % = 3 |
is same as |
y = y % 3 |
The Comma Operator
The comma is frequently used in C as a simple punctuation mark, to separate variable declarations, function arguments, etc. In certain situations, the comma acts as an operator.
You can form an expression by separating two sub expressions with a comma. The result is as follows:
- Both expressions are evaluated, with the left expression being evaluated first.
- The entire expression evaluates to the value of the right expression.
For example, the following statement assigns the value of b to x, then increments a, and then increments b:
x = (a++, b++);
C operator precedence (Summary of C operators)
| Rank and Associativity |
Operators |
| 1(left to right) |
() [] -> . |
| 2(right to left) |
! ~ ++ -- * (indirection) & (address-of) (type)
sizeof + (unary) - (unary) |
| 3(left to right) |
* (multiplication) / % |
| 4(left to right) |
+ - |
| 5(left to right) |
<< >> |
| 6(left to right) |
< <= > >= |
| 7(left to right) |
= = != |
| 8(left to right) |
& (bitwise AND) |
| 9(left to right) |
^ |
| 10(left to right) |
| |
| 11(left to right) |
&& |
| 12(left to right) |
|| |
| 13(right to left) |
?: |
| 14(right to left) |
= += -= *= /= %= &= ^= |= <<= >>= |
| 15(left to right) |
, |
| () is the function operator; [] is the array operator. |
|
Let us take an example of use of operators:
/* Use Of Operators */
int main()
            {
            int   x = 0, y = 2, z = 1025;
            float a = 0.0, b = 3.14159, c = -37.234;
              /* incrementing */
              x = x + 1;       /* This increments x */
              x++;             /* This increments x */
              ++x;             /* This increments x */
              z = y++;         /* z = 2, y = 3 */
              z = ++y;         /* z = 4, y = 4 */
              /* decrementing */
              y = y - 1;       /* This decrements y */
              y--;             /* This decrements y */
              --y;             /* This decrements y */
              y = 3;
              z = y--;         /* z = 3, y = 2 */
              z = --y;         /* z = 1, y = 1 */
              /* arithmetic op */
              a = a + 12;      /* This adds 12 to a         */
              a += 12;         /* This adds 12 more to a    */
              a *= 3.2;        /* This multiplies a by 3.2  */
              a -= b;          /* This subtracts b from a   */
              a /= 10.0;       /* This divides a by 10.0    */
              /* conditional expression */
              a = (b >= 3.0 ? 2.0 : 10.5 );   /* This expression */
              if (b >= 3.0)                /* And this expression */
              a = 2.0;                  /* are identical, both */
                else                         /* will cause the same */
              a = 10.5;                 /* result.             */
              c = (a > b ? a : b); /* c will have the max of a or b */
              c = (a > b ? b : a); /* c will have the min of a or b */
             printf("x=%d, y=%d, z= %d\n", x, y, z);
             printf("a=%f, b=%f, c= %f", a, b, c);
          return 0;
            }
and the result of this program will be displayed on the screen as:
              x=3, y=1, z=1
            a=2.000000, b=3.141590, c=2.000000
Something more about printf() and Scanf()
Consider the following two printf statements
printf(“\t %d\n”, num);
               printf(“%5.2f”, fract);
in the first printf statement \t requests for the tab displacement on the screen the argument %d tells the compiler that the value of num should be printed as decimal integer. \n causes the new output to start from new line.
In second printf statement %5.2f tells the compiler that the output must be in floating point, with five places in all and two places to the right of the decimal point. More about the backslash character has been shown in the following table:
| Constant |
Meaning |
| ‘\a’ |
Audible alert (bell) |
| ‘\b’ |
Backspace |
| ‘\f’ |
Form feed |
| ‘\n’ |
New line |
| ‘\r’ |
Carriage return |
| ‘\t’ |
Horizontal tab |
| ‘\v’ |
Vertical tab |
| ‘\’’ |
Single quote |
| ‘\”’ |
Double quote |
| ‘\?’ |
Question mark |
| ‘\\’ |
Backslash |
| ‘\0’ |
Null |
Let us consider the following scanf statement
scanf(“%d”, &num);
The data from the keyboard is received by scanf function. In the above format, the & (ampersand) symbol before each variable name is an operator that specifies the address of variable name.
By doing this, the execution stops and waits for the value of the variable num to be typed. When the integer value is entered and return key is pressed, the computer proceeds to the next statement. The scanf and printf format codes are listed in the following table:
| Code |
Reads... |
| %c |
Single character |
| %d |
Decimal integer |
| %e |
Floating point value |
| %f |
Floating point value |
| %g |
Floating point value |
| %h |
Short integer |
| %i |
Decimal, hexadecimal or octal integer |
| %o |
Octal integer |
| %s |
String |
| %u |
Unsigned decimal integer |
| %x |
Hexadecimal integer |
Control Statements
A program consists of a number of statements which are usually executed in sequence. Programs can be much more powerful if we can control the order in which statements are run.
Statements fall into three general types:
- Assignment, where values, usually the results of calculations, are stored in variables.
- Input / Output, data is read in or printed out.
- Control, the program makes a decision about what to do next.
This section will discuss the use of control statements in C. We will show how they can be used to write powerful programs by;
- Repeating important sections of the program.
- Selecting between optional sections of a program.
The if else Statement
This is used to decide whether to do something at a special point, or to decide between two courses of action.
The following test decides whether a student has passed an exam with a pass mark of 45
if (result >= 45)
             printf("Pass\n");
             else
             printf("Fail\n");
             It is possible to use the if part without the else.
             if (temperature < 0)
             print("Frozen\n");
Each version consists of a test, in the bracketed statement following the if. If the test is true then the next statement is obeyed. If it is false then the statement following the else is obeyed if present. After this, the rest of the program continues as normal.
If we wish to have more than one statement following the if or the else, they should be grouped together between curly brackets. Such a grouping is called a compound statement or a block.
if (result >= 45)
             { printf("Passed\n");
             printf("Congratulations\n");
             }
             else
             { printf("Failed\n");
             printf("Better Luck Next Time\n");
             }
Sometimes we wish to make a multi-way decision based on several conditions. The most general way of doing this is by using the else if variant on the if statement.
This works by cascading several comparisons. As soon as one of these gives a true result, the following statement or block is executed, and no further comparisons are performed. In the following example we are awarding grades depending on the exam result.
if (result <=100 && result >= 75)
             printf("Passed: Grade A\n");
             else if (result >= 60)
             printf("Passed: Grade B\n");
             else if (result >= 45)
             printf("Passed: Grade C\n");
             else
             printf("Failed\n");
In this example, all comparisons test a single variable called result. In other cases, each test may involve a different variable or some combination of tests. The same pattern can be used with more or fewer else if's, and the final alone else may be left out.
It is up to the programmer to devise the correct structure for each programming problem. To better understand the use of if else let us see the example
              #include <stdio.h>
            int main()
              {
              int num;
              for(num = 0 ; num < 10 ; num = num + 1)
              {
             if (num == 2)
             printf("num is now equal to %d\n", num);
             if (num < 5)
             printf("num is now %d, which is less than 5\n", num);
             else
             printf("num is now %d, which is greater than 4\n", num);
          } /* end of for loop */
          return 0;
             }
Result of the program
                num is now 0, which is less than 5
              num is now 1, which is less than 5
              num is now equal to 2
              num is now 2, which is less than 5
              num is now 3, which is less than 5
              num is now 4, which is less than 5
              num is now 5, which is greater than 4
              num is now 6, which is greater than 4
              num is now 7, which is greater than 4
              num is now 8, which is greater than 4
              num is now 9, which is greater than 4
The switch Statement
This is another form of the multi way decision. It is well structured, but can only be used in certain cases where;
- Only one variable is tested, all branches must depend on the value of that variable. The variable must be an integral type. (int, long, short or char).
- Each possible value of the variable can control a single branch. A final, catch all, default branch may optionally be used to trap all unspecified cases.
Example given below will clarify things. This is a function which converts an integer into a vague description. It is useful where we are only concerned in measuring a quantity when it is quite small.
estimate(number)
             int number;
             /* Estimate a number as none, one, two, several, many */
             { switch(number) {
             case 0 :
             printf("None\n");
             break;
             case 1 :
             printf("One\n");
             break;
             case 2 :
             printf("Two\n");
             break;
             case 3 :
             case 4 :
             case 5 :
             printf("Several\n");
             break;
             default :
             printf("Many\n");
             break;
             }
             }
Each interesting case is listed with a corresponding action. The break statement prevents any further statements from being executed by leaving the switch. Since case 3 and case 4 have no following break, they continue on allowing the same action for several values of number.
Both if and switch constructs allow the programmer to make a selection from a number of possible actions. Let us see an example:
             #include <stdio.h>
           int main()
             {
             int num;
             for (num = 3 ; num < 13 ; num = num + 1)
             {
           switch (num)
             {
             case 3 :
             printf("The value is three\n");
             break;
             case 4 :
             printf("The value is four\n");
             break;
             case 5 :
             case 6 :
             case 7 :
             case 8 :
             printf("The value is between 5 and 8\n");
           break;
             case 11 :
             printf("The value is eleven\n");
             break;
           default :
             printf("It is one of the undefined values\n");
             break;
              } /* end of switch */
              } /* end of for loop */
           return 0;
            }
The output of the program will be
                The value is three
                The value is four
                The value is between 5 and 8
                The value is between 5 and 8
                The value is between 5 and 8
                The value is between 5 and 8
                It is one of the undefined values
                It is one of the undefined values
                The value is eleven
                It is one of the undefined values
The break Statement
We have already met break in the discussion of the switch statement. It is used to exit from a loop or a switch, control passing to the first statement beyond the loop or a switch.
With loops, break can be used to force an early exit from the loop, or to implement a loop with a test to exit in the middle of the loop body. A break within a loop should always be protected within an if statement which provides the test to control the exit condition.
The continue Statement
This is similar to break but is encountered less frequently. It only works within loops where its effect is to force an immediate jump to the loop control statement.
- In a while loop, jump to the test statement.
- In a do while loop, jump to the test statement.
- In a for loop, jump to the test, and perform the iteration.
Like a break, continue should be protected by an if statement. You are unlikely to use it very often. To better understand the use of break and continue let us examine the following program:
            #include <stdio.h>
          int main()
             {
             int value;
           for(value = 5 ; value < 15 ; value = value + 1)
             {
             if (value == 8)
             break;
          printf("In the break loop, value is now %d\n", value);
             }
          for(value = 5 ; value < 15 ; value = value + 1)
             {
             if (value == 8)
             continue;
           printf("In the continue loop, value is now %d\n", value);
            }
           return 0;
             }
The output of the program will be as follows:
                In the break loop, value is now 5
               In the break loop, value is now 6
               In the break loop, value is now 7
               In the continue loop, value is now 5
               In the continue loop, value is now 6
               In the continue loop, value is now 7
               In the continue loop, value is now 9
               In the continue loop, value is now 10
               In the continue loop, value is now 11
               In the continue loop, value is now 12
               In the continue loop, value is now 13
               In the continue loop, value is now 14
Loops
The other main type of control statement is the loop. Loops allow a statement, or block of statements, to be repeated. Computers are very good at repeating simple tasks many times. The loop is C's way of achieving this.
C gives you a choice of three types of loop, while, do-while and for.
- The while loop keeps repeating an action until an associated test returns false. This is useful where the programmer does not know in advance how many times the loop will be traversed.
- The do while loops is similar, but the test occurs after the loop body is executed. This ensures that the loop body is run at least once.
- The for loop is frequently used, usually where the loop will be traversed a fixed number of times. It is very flexible, and novice programmers should take care not to abuse the power it offers.
The while Loop
The while loop repeats a statement until the test at the top proves false. As an example, here is a function to return the length of a string. Remember that the string is represented as an array of characters terminated by a null character '\0'.
              int string_length(char string[])
             { int i = 0;
             while (string[i] != '\0')
               i++;
             return(i);
             }
The string is passed to the function as an argument. The size of the array is not specified, the function will work for a string of any size.
The while loop is used to look at the characters in the string one at a time until the null character is found. Then the loop is exited and the index of the null is returned.
While the character is not null, the index is incremented and the test is repeated. We’ll go in depth of arrays later. Let us see an example for while loop:
              #include <stdio.h>
            int main()
             {
             int count;
            count = 0;
            while (count < 6)
             {
             printf("The value of count is %d\n", count);
             count = count + 1;
             }
           return 0;
             }
and the result is displayed as follows:
                The value of count is 0
              The value of count is 1
              The value of count is 2
              The value of count is 3
              The value of count is 4
              The value of count is 5
The do while Loop
This is very similar to the while loop except that the test occurs at the end of the loop body. This guarantees that the loop is executed at least once before continuing.
Such a setup is frequently used where data is to be read. The test then verifies the data, and loops back to read again if it was unacceptable.
do
             {
             printf("Enter 1 for yes, 0 for no :");
            scanf("%d", &input_value);
             } while (input_value != 1 && input_value != 0)
To better understand the do while loop let us see the following example:
#include <stdio.h>
               int main()
               {
             int i;
             i = 0;
             do
             {
             printf("The value of i is now %d\n", i);
             i = i + 1;
             } while (i < 5);
          return 0;
             }
The result of the program is displayed as follows:
                The value of i is now 0
              The value of i is now 1
              The value of i is now 2
              The value of i is now 3
              The value of i is now 4
The for Loop
The for loop works well where the number of iterations of the loop is known before the loop is entered. The head of the loop consists of three parts separated by semicolons.
- The first is run before the loop is entered. This is usually the initialization of the loop variable.
- The second is a test, the loop is exited when this returns false.
- The third is a statement to be run every time the loop body is completed. This is usually an increment of the loop counter.
The example is a function which calculates the average of the numbers stored in an array. The function takes the array and the number of elements as arguments.
              float average(float array[], int count)
            {
            float total = 0.0;
            int i;
            for(i = 0; i < count; i++)
            total += array[i];
            return(total / count);
            }
The for loop ensures that the correct number of array elements are added up before calculating the average.
The three statements at the head of a for loop usually do just one thing each, however any of them can be left blank. A blank first or last statement will mean no initialization or running increment. A blank comparison statement will always be treated as true. This will cause the loop to run indefinitely unless interrupted by some other means. This might be a return or a break statement.
It is also possible to squeeze several statements into the first or third position, separating them with commas. This allows a loop with more than one controlling variable. The example below illustrates the definition of such a loop, with variables hi and lo starting at 100 and 0 respectively and converging.
The for loop gives a variety of shorthand to be used in it. Watch out the following expression, in this expression the single loop contains two for loops in it. Here hi-- is same as hi = hi - 1 and lo++ is same as lo = lo + 1,
for(hi = 100, lo = 0; hi >= lo; hi--, lo++)
The for loop is extremely flexible and allows many types of program behavior to be specified simply and quickly. Let us see an example of for loop
              #include <stdio.h>
            int main()
            {
            int index;
            for(index = 0 ; index < 6 ; index = index + 1)
            printf("The value of the index is %d\n", index);
          return 0;
            }
Result of the program is displayed as follows:
                The value of the index is 0
              The value of the index is 1
              The value of the index is 2
              The value of the index is 3
              The value of the index is 4
              The value of the index is 5
The goto Statement
C has a goto statement which permits unstructured jumps to be made. To use a goto statement, you simply use the reserved word goto followed by the symbolic name to which you wish to jump. The name is then placed anywhere in the program followed by a colon. You can jump nearly anywhere within a function, but you are not permitted to jump into a loop, although you are allowed to jump out of a loop.
This particular program is really a mess but it is a good example of why software writers are trying to eliminate the use of the goto statement as much as possible. The only place in this program where it is reasonable to use the goto is, where the program jumps out of the three nested loops in one jump. In this case it would be rather messy to set up a variable and jump successively out of each of the three nested loops but one goto statement gets you out of all three in a very concise manner.
Some persons say the goto statement should never be used under any circumstances, but this is narrow minded thinking. If there is a place where a goto will clearly do a neater control flow than some other construct, feel free to use it, however, as it is in the rest of the program on your monitor. Let us see the example:
             #include <stdio.h>
           int main()
            {
            int dog, cat, pig;
            goto real_start;
            some_where:
            printf("This is another line of the mess.\n");
            goto stop_it;
          /* the following section is the only section with a useable goto */
            real_start:
           for(dog = 1 ; dog < 6 ; dog = dog + 1)
            {
           for(cat = 1 ; cat < 6 ; cat = cat + 1)
            {
           for(pig = 1 ; pig < 4 ; pig = pig + 1)
            {
            printf("Dog = %d  Cat = %d  Pig = %d\n", dog, cat, pig);
           if ((dog + cat + pig) > 8 ) goto enough;
            }
            }
            }
        enough: printf("Those are enough animals for now.\n");
          /* this is the end of the section with a useable goto statement */
          printf("\nThis is the first line of the code.\n");
            goto there;
           where:
            printf("This is the third line of the code.\n");
            goto some_where;
            there:
            printf("This is the second line of the code.\n");
            goto where;
            stop_it:
            printf("This is the last line of this mess.\n");
            return 0;
            }
Let us see the results displayed
                Dog = 1 Cat = 1 Pig = 1
              Dog = 1 Cat = 1 Pig = 2
              Dog = 1 Cat = 1 Pig = 3
              Dog = 1 Cat = 2 Pig = 1
              Dog = 1 Cat = 2 Pig = 2
              Dog = 1 Cat = 2 Pig = 3
              Dog = 1 Cat = 3 Pig = 1
              Dog = 1 Cat = 3 Pig = 2
              Dog = 1 Cat = 3 Pig = 3
              Dog = 1 Cat = 4 Pig = 1
              Dog = 1 Cat = 4 Pig = 2
              Dog = 1 Cat = 4 Pig = 3
              Dog = 1 Cat = 5 Pig = 1
              Dog = 1 Cat = 5 Pig = 2
              Dog = 1 Cat = 5 Pig = 3
                Those are enough animals for now.
                This is the first line of the code.
                This is the second line of the code.
                This is the third line of the code.
                This is another line of the mess.
                This is the last line of this mess.
Pointers
Sometimes we want to know where a variable resides in memory. A pointer contains the address of a variable that has a specific value. When declaring a pointer, an asterisk is placed immediately before the pointer name.
The address of the memory location where the variable is stored can be found by placing an ampersand in front of the variable name.
 int num; /* Normal integer variable */
             int *numPtr; /* Pointer to an integer variable */
The following example prints the variable value and the address in memory of that variable.
printf("The value %d is stored at address %X\n", num, &num);
To assign the address of the variable num to the pointer numPtr, you assign the address of the variable, num, as in the example given next:
numPtr = #
To find out what is stored at the address pointed to by numPtr, the variable needs to be dereferenced. Dereferencing is achieved with the asterisk that the pointer was declared with.
printf("The value %d is stored at address %X\n", *numPtr, numPtr);
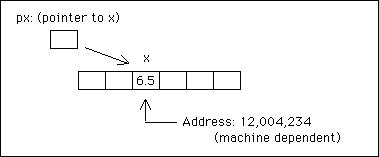
All variables in a program reside in memory. The statements given below request that the compiler reserve 4 bytes of memory on a 32-bit computer for the floating-point variable x, then put the value 6.5 in it.
               float x;
             x = 6.5;
As the address location in memory of any variable is obtained by placing the operator & before its name therefore &x is the address of x. C allows us to go one stage further and define a variable, called a pointer that contains the address of other variables. Rather we can say that pointer points to other variable. For example:
               float x;
             float* px;
             x = 6.5;
             px = &x;
defines px to be a pointer to objects of type float, and sets it equal to the address of x. Thus, *px refers to the value of x:
Let us examine the following statements:
 int var_x;
              int* ptrX;
              var_x = 6;
              ptrX = &var_x;
              *ptrX = 12;
              printf("value of x : %d", var_x);
The first line causes the compiler to reserve a space in memory for an integer. The second line tells the compiler to reserve space to store a pointer.
A pointer is a storage location for an address. The third line should remind you the scanf statements. The address "&" operator tells compiler to go to the place it stored var_x, and then give the address of the storage location to ptrX.
The asterisk * in front of a variable tells the compiler to dereference the pointer, and go to memory. Then you can make assignments to variable stored at that location. You can reference a variable and access its data through a pointer. Let us see an example of pointers:
/* illustration of pointer use */
            #include <stdio.h>
            int main()
            {
             int index, *pt1, *pt2;
             index = 39;        /* any numerical value */
            pt1 = &index;      /* the address of index */
            포인트2 = 포인트1;
            printf("값은 %d %d %d 입니다\n", index, *pt1, *pt2);
           *pt1 = 13; /* 이것은 인덱스 값을 변경합니다 */
            printf("값은 %d %d %d 입니다\n", index, *pt1, *pt2);
            0을 반환합니다.
            }
프로그램의 출력은 다음과 같이 표시됩니다.
              값은 39 39 39 입니다
            값은 13 13 13 입니다
포인터의 사용을 더 잘 이해하기 위해 또 다른 예를 살펴보겠습니다.
#include <stdio.h>
              #include <string.h>
         int 메인()
            {
          char strg[40], *거기, 하나, 둘;
            int *pt, 리스트[100], 인덱스;
         strcpy(strg, "이것은 문자열입니다.");
         /* strcpy() 함수는 한 문자열을 다른 문자열로 복사하는 것입니다. 나중에 문자열 섹션에서 strcpy() 함수에 대해 알아볼 것입니다. */
          one = strg[0]; /* one과 two는 동일합니다 */
            두 = *ctrl;
          printf("첫 번째 출력은 %c %c\n", one, two);
          one = strg[8]; /* one과 two는 동일합니다 */
            2 = *(ctrl+8);
          printf("두 번째 출력은 %c %c\n", one, two);
         거기 = ctrl+10; /* strg+10은 &strg[10]과 동일합니다. */
           printf("세 번째 출력은 %c\n입니다", strg[10]);
            printf("네 번째 출력은 %c\n입니다", *there);
          인덱스 = 0 ; 인덱스 < 100 ; 인덱스++)
            목록[인덱스] = 인덱스 + 100;
            포인트 = 리스트 + 27;
          printf("다섯 번째 출력은 %d\n입니다", list[27]);
            printf("여섯 번째 출력은 %d\n", *pt);
          0을 반환합니다.
            }
프로그램의 출력은 다음과 같습니다.
                첫번째 출력은 TT
              두번째 출력은 aa
              세번째 출력은 c
              네번째 출력은 c
              다섯번째 출력은 127
              여섯번째 출력은 127
배열
배열은 같은 유형의 변수 모음입니다. 개별 배열 요소는 정수 인덱스로 식별됩니다. C에서 인덱스는 0에서 시작하며 항상 대괄호 안에 작성됩니다.
우리는 이미 이와 같이 선언된 단일 차원 배열을 만났습니다.
int 결과[20];
배열은 차원이 더 많을 수 있으며 이 경우 다음과 같이 선언될 수 있습니다.
              int 결과_2d[20][5];
            int 결과_3d[20][5][3];
각 인덱스에는 자체 대괄호 세트가 있습니다. 배열은 메인 함수에서 선언되며 일반적으로 차원에 대한 세부 정보가 포함됩니다. 배열 대신 포인터라는 다른 유형을 사용할 수 있습니다. 즉, 차원은 즉시 고정되지 않지만 필요에 따라 공간을 할당할 수 있습니다. 이는 특정 특수 프로그램에서만 필요한 고급 기술입니다.
예를 들어, 다음은 1차원 배열의 모든 정수를 더하는 간단한 함수입니다.
int 배열 추가(int 배열[], int 크기)
            {
            안녕하세요.
            int 총 = 0;
             i = 0; i < 크기; i++)
               전체 += 배열[i];
            반환(전체);
            }
다음에 주어진 프로그램은 문자열을 만들고, 문자열의 일부 데이터에 액세스하고, 출력합니다. 포인터를 사용하여 다시 액세스한 다음 문자열을 출력합니다. 다른 줄에 "Hi!"와 "012345678"을 출력해야 합니다. 프로그램의 코딩을 살펴보겠습니다.
#include <stdio.h>
            #STR_LENGTH 10을 정의합니다.
            void 메인()
            {
            char Str[STR_LENGTH];
            char* 문자열;
            안녕하세요.
            str[0] = 'H';
            Str[1] = 'i';
            **Str[2] = '!';**
            Str[3] = '\0'; // 특수 종료 문자열 문자 NULL
            printf("Str의 문자열은 : %s\n", Str);
            str[0] = str[0];
            i = 0; i < STR_LENGTH; i++에 대하여
            {
            *pStr = '0'+i;
            영어: 이것은 pStr++의 예이다.
            }
            문자열[STR_LENGTH-1] = '\0';
            printf("Str의 문자열은 : %s\n", Str);
            }
[] (대괄호)는 배열을 선언하는 데 사용됩니다. 프로그램 char Str[STR_LENGTH];의 줄은 10개 문자의 배열을 선언합니다. 이는 10개의 개별 문자이며, 모두 메모리의 같은 위치에 함께 배치됩니다. 모두 [n]과 함께 변수 이름 Str을 통해 액세스할 수 있습니다. 여기서 n은 요소 번호입니다.
배열에 대해 이야기할 때 항상 염두에 두어야 할 점은 C가 10개의 배열을 선언할 때 액세스할 수 있는 요소에 0~9가 매겨진다는 것입니다. 첫 번째 요소에 액세스하는 것은 0번째 요소에 액세스하는 것과 같습니다. 따라서 배열의 경우 항상 0부터 배열 크기 - 1까지 계산합니다.
다음으로 "Hi!"라는 문자를 배열에 넣었지만, 그 다음에 '\0'을 넣었습니다. 아마 이게 뭔지 궁금하실 겁니다. "\0"은 NULL을 의미하고 문자열의 끝을 나타냅니다. 모든 문자열은 이 특수 문자 '\0'으로 끝나야 합니다. 그렇지 않은 경우, 누군가가 문자열에 printf를 호출하면 printf는 문자열의 메모리 위치에서 시작하여 인쇄를 계속하면서 '\0'을 만나게 되고, 결국 문자열 끝에 가비지 덩어리가 생깁니다. 따라서 문자열을 올바르게 종료해야 합니다.
문자 배열
다음과 같은 문자열 상수
"나는 줄이다"
문자 배열입니다. C 내부적으로 문자열의 ASCII 문자, 즉 "I", 공백, "a", "m", ... 또는 위의 문자열로 표현되고 특수 널 문자 "\0"으로 종료되므로 프로그램은 문자열의 끝을 찾을 수 있습니다.
문자열 상수는 종종 printf를 사용하여 코드의 출력을 이해하기 쉽게 만드는 데 사용됩니다.
             printf("안녕하세요, 세상\n");
             printf("a의 값은 %f\n", a);
문자열 상수는 변수와 연관될 수 있습니다. C는 한 번에 한 문자(1바이트)를 포함할 수 있는 문자 유형 변수를 제공합니다. 문자열은 문자 유형 배열에 저장되며, 위치당 하나의 ASCII 문자가 있습니다.
Never forget that, since strings are conventionally terminated by the null character “\0”, we require one extra storage location in the array.
C does not provide any operator which manipulates entire strings at once. Strings are manipulated either via pointers or via special routines available from the standard string library string.h.
Using character pointers is relatively easy since the name of an array is a just a pointer to its first element. Consider the program given next:
#include<stdio.h>
               void main()
             {
            char text_1[100], text_2[100], text_3[100];
            char *ta, *tb;
            int i;
            /* set message to be an arrray  */
            /* of characters; initialize it */
            /* to the constant string "..." */
            /* let the compiler decide on   */
            /* its size by using []         */
            char message[] = "Hello, I am a string; what are
            you?";
            printf("Original message: %s\n", message);
           /* copy the message to text_1   */
            i=0;
         while ( (text_1[i] = message[i]) != '\0' )
            i++;
          printf("Text_1: %s\n", text_1);
           /* use explicit pointer arithmetic */
            ta=message;
            tb=text_2;
            while ( ( *tb++ = *ta++ ) != '\0' )
            ;
          printf("Text_2: %s\n", text_2);
            }
The output of the program will be as follows:
              Original message: Hello, I am a string; what are you?
               Text_1: Hello, I am a string; what are you?
               Text_2: Hello, I am a string; what are you?
The standard “string” library contains many useful functions to manipulate strings, which we will learn in the string section later.
Accessing the Elements
To access an individual element in the array, the index number follows the variable name in square brackets. The variable can then be treated like any other variable in C. The following example assigns a value to the first element in the array.
x[0] = 16;
The following example prints the value of the third element in an array.
printf("%d\n", x[2]);
The following example uses the scanf function to read a value from the keyboard into the last element of an array with ten elements.
scanf("%d", &x[9]);
Initializing Array Elements
Arrays can be initialized like any other variables by assignment. As an array contains more than one value, the individual values are placed in curly braces, and separated with commas. The following example initializes a ten dimensional array with the first ten values of the three times table.
int x[10] = {3, 6, 9, 12, 15, 18, 21, 24, 27, 30};
This saves assigning the values individually as in the following example.
            int x[10];
             x[0] = 3;
             x[1] = 6;
             x[2] = 9;
             x[3] = 12;
             x[4] = 15;
             x[5] = 18;
             x[6] = 21;
             x[7] = 24;
             x[8] = 27;
             x[9] = 30;
Looping through an Array
As the array is indexed sequentially, we can use the for loop to display all the values of an array. The following example displays all the values of an array:
              #include <stdio.h>
            int main()
            {
            int x[10];
            int counter;
            /* Randomise the random number generator */
            srand((unsigned)time(NULL));
            /* Assign random values to the variable */
            for (counter=0; counter<10; counter++)
            x[counter] = rand();
            /* Display the contents of the array */
            for (counter=0; counter<10; counter++)
            printf("element %d has the value %d\n", counter, x[counter]);
          return 0;
            }
though the output will print the different values every time, result will be displayed something like this:
                 element 0 has the value 17132
               element 1 has the value 24904
               element 2 has the value 13466
               element 3 has the value 3147
               element 4 has the value 22006
               element 5 has the value 10397
               element 6 has the value 28114
               element 7 has the value 19817
               element 8 has the value 27430
               element 9 has the value 22136
Multidimensional Arrays
An array can have more than one dimension. By allowing the array to have more than one dimension provides greater flexibility. For example, spreadsheets are built on a two dimensional array; an array for the rows, and an array for the columns.
The following example uses a two dimensional array with two rows, each containing five columns:
 #include <stdio.h>
            int main()
            {
            /* Declare a 2 x 5 multidimensional array */
          int x[2][5] = { {1, 2, 3, 4, 5},
            {2, 4, 6, 8, 10} };
            int row, column;
            /* Display the rows */
          for (row=0; row<2; row++)
            {
           /* Display the columns */
            for (column=0; column<5; column++)
           printf("%d\t", x[row][column]);
            putchar('\n');
            }
            return 0;
            }
The output of this program will be displayed as follows:
              1 2 3 4 5
            2 4 6 8 10
Strings
A string is a group of characters, usually letters of the alphabet, In order to format your print display in such a way that it looks nice, has meaningful names and titles, and is aesthetically pleasing to you and the people using the output of your program.
In fact, you have already been using strings in the examples of the previous topics. But it is not the complete introduction of strings. There are many possible cases in the programming, where the use of formatted strings helps the programmer to avoid the too many complications in the program and too many bugs of course.
문자열의 완전한 정의는 널 문자('\0')로 끝나는 일련의 문자 유형 데이터입니다.
C에서 문자열 데이터를 어떤 식으로든 사용할 때, 즉 다른 문자열과 비교하거나, 출력하거나, 다른 문자열에 복사하는 등의 작업을 할 때, 함수들은 null이 감지될 때까지 호출된 대로 작업을 수행하도록 설정됩니다.
C에서 문자열에 대한 기본 데이터 유형은 없습니다. 대신 C의 문자열은 문자 배열로 구현됩니다. 예를 들어 이름을 저장하려면 이름을 저장할 만큼 큰 문자 배열을 선언한 다음 적절한 라이브러리 함수를 사용하여 이름을 조작할 수 있습니다.
다음 예제는 사용자가 입력한 문자열을 화면에 표시합니다.
#include <stdio.h>
            int 메인()
            {
            char name[80]; /* 문자 배열을 생성합니다.
            불리는 이름 */
          printf("이름을 입력하세요: ");
            이름을 가져옵니다.
          printf("입력하신 이름은 %s\n", name);
            0을 반환합니다.
            }
프로그램 실행은 다음과 같습니다.
              이름을 입력하세요: Tarun Tyagi
              입력한 이름은 Tarun Tyagi 입니다.
일반적인 문자열 함수 몇 가지
표준 string.h 라이브러리에는 문자열을 조작하는 데 유용한 함수가 많이 들어 있습니다. 가장 유용한 함수 중 일부가 여기에 예시되어 있습니다.
strlen 함수
strlen 함수는 문자열의 길이를 결정하는 데 사용됩니다. 예를 들어 strlen의 사용법을 알아보겠습니다.
#include <stdio.h>
            #include <string.h>
            int 메인()
            {
            문자 이름[80];
            int 길이;
            printf("이름을 입력하세요: ");
            이름을 가져옵니다.
            길이 = strlen(이름);
            printf("당신의 이름은 %d자입니다\n", length);
            0을 반환합니다.
            }
그리고 프로그램의 실행은 다음과 같습니다.
              이름을 입력하세요: Tarun Subhash Tyagi
            이름은 19 자 입니다.
            이름을 입력하세요: Preeti Tarun
            이름은 12 자 입니다.
strcpy 함수
strcpy 함수는 한 문자열을 다른 문자열로 복사하는 데 사용됩니다. 예를 들어 이 함수의 사용법을 알아보겠습니다.
#include <stdio.h>
            #include <string.h>
            int 메인()
            {
            char first[80];
            char 초[80];
            printf("첫 번째 문자열을 입력하세요: ");
            (첫 번째)를 가져옵니다.
            printf("두 번째 문자열을 입력하세요: ");
            gets(두 번째);
            printf("첫 번째: %s, 두 번째: %s strcpy() 전\n "
            , 첫 번째, 두 번째);
            strcpy(두 번째, 첫 번째);
            printf("첫 번째: %s, 두 번째: %s strcpy() 이후\n",
            첫 번째, 두 번째);
            0을 반환합니다.
            }
그리고 프로그램의 출력은 다음과 같습니다.
              첫 번째 문자열을 입력하세요: Tarun
            두 번째 문자열을 입력하세요: Tyagi
            첫 번째: Tarun , 두 번째: Tyagi strcpy() 전
            첫 번째: Tarun , 두 번째: Tarun strcpy() 이후
strcmp 함수
strcmp 함수는 두 문자열을 서로 비교하는 데 사용됩니다. 배열의 변수 이름은 해당 배열의 기본 주소를 가리킵니다. 따라서 다음을 사용하여 두 문자열을 비교하려고 하면 두 주소를 비교하게 되는데, 이는 두 값을 같은 위치에 저장할 수 없기 때문에 분명히 결코 같지 않습니다.
if (first == second) /* 문자열을 비교할 수 없습니다. */
다음 예제에서는 strcmp 함수를 사용하여 두 문자열을 비교합니다.
#include <string.h>
            int 메인()
            {
            char 첫 번째[80], 두 번째[80];
            정수 t;
            t=1;t<=2;t++에 대하여
            {
            printf("\n문자열을 입력하세요: ");
            (첫 번째)를 가져옵니다.
            printf("다른 문자열을 입력하세요: ");
            gets(두 번째);
            if (strcmp(첫 번째, 두 번째) == 0)
            puts("두 문자열은 같습니다");
             또 다른
            puts("두 문자열이 같지 않습니다");
            }
            0을 반환합니다.
            }
그리고 프로그램의 실행은 다음과 같습니다.
              문자열을 입력하세요: Tarun
            다른 문자열을 입력하세요: tarun
            두 문자열이 같지 않습니다
            문자열을 입력하세요: Tarun
            다른 문자열을 입력하세요: Tarun
            두 문자열은 같습니다
strcat 함수
strcat 함수는 한 문자열을 다른 문자열에 연결하는 데 사용됩니다. 어떻게 하는지 살펴보겠습니다. 예를 들어 다음과 같습니다.
              #include <string.h>
            int 메인()
            {
            char 첫 번째[80], 두 번째[80];
            printf("문자열을 입력하세요: ");
            (첫 번째)를 가져옵니다.
            printf("다른 문자열을 입력하세요: ");
            gets(두 번째);
            strcat(첫 번째, 두 번째);
            printf("두 문자열이 결합되었습니다: %s\n",
            첫 번째);
            0을 반환합니다.
            }
그리고 프로그램의 실행은 다음과 같습니다.
              문자열을 입력하세요: Data
            다른 문자열을 입력하세요: Recovery
            두 개의 문자열이 결합되었습니다: DataRecovery
strtok 함수
strtok 함수는 문자열에서 다음 토큰을 찾는 데 사용됩니다. 토큰은 가능한 구분 기호 목록으로 지정됩니다.
다음 예제는 파일에서 텍스트 한 줄을 읽고 구분 기호, 공백, 탭, 새 줄을 사용하여 단어를 결정합니다. 그런 다음 각 단어가 별도의 줄에 표시됩니다.
              #include <stdio.h>
            #include <string.h>
            int 메인()
            {
            파일 *in;
            char 라인[80];
            char *구분문자 = " \t\n";
            char *토큰;
            if ((in = fopen("C:\\text.txt", "r")) == NULL)
            {
            puts("입력 파일을 열 수 없습니다.");
            0을 반환합니다.
            }
      /* 한 번에 한 줄씩 읽습니다. */
            while(!feof(in))
            {
            /* 한 줄을 가져옵니다 */
            fgets(줄, 80, 입력);
          if (!feof(in))
            {
            /* 줄을 단어로 나눕니다 */
            토큰 = strtok(줄, 구분 기호);
          while (토큰 != NULL)
            {
            토큰을 넣습니다.
            /* 다음 단어를 얻으세요 */
            토큰 = strtok(NULL, 구분 기호);
            }
            }
            }
            fclose(입력);
            0을 반환합니다.
            }
위의 프로그램에서 = fopen("C:\\text.txt", "r")은 기존 파일 C:\\text.txt를 엽니다. 지정된 경로에 존재하지 않거나 어떤 이유로든 파일을 열 수 없는 경우 화면에 오류 메시지가 표시됩니다.
다음 예제에서는 이러한 기능 중 일부를 사용합니다.
              #include <stdio.h>
            #include <string.h>
            void 메인()
            {
            char line[100], *sub_text;
             /* 문자열 초기화 */
            strcpy(line, "안녕하세요, 저는 문자열입니다;");
            printf("줄: %s\n", 줄);
             /* 문자열 끝에 추가 */
            strcat(줄, "당신은 무엇입니까?");
            printf("줄: %s\n", 줄);
            /* 문자열 길이 찾기 */
            /* strlen은 다시 가져옵니다 */
            /* size_t 유형으로 길이 지정 */
           printf("줄 길이: %d\n", (int)strlen(줄));
            /* 하위 문자열의 발생을 찾습니다. */
            if ( (sub_text = strchr ( line, 'W' ) ) != NULL )
           printf("\"W\"로 시작하는 문자열 ->%s\n",
            하위 텍스트);
            if ( ( sub_text = strchr ( line, 'w' ) ) != NULL )
           printf("\"w\"로 시작하는 문자열 ->%s\n",
            하위 텍스트);
            if ( ( sub_text = strchr ( sub_text, 'u' ) ) != NULL )
            printf("\"w\"로 시작하는 문자열 ->%s\n",
            하위 텍스트);
            }
프로그램의 출력은 다음과 같이 표시됩니다.
              줄: 안녕하세요, 저는 문자열입니다.
            줄: 안녕하세요, 저는 문자열입니다. 당신은 무엇인가요?
            줄의 길이: 35
            "w"로 시작하는 문자열 ->당신은 무엇입니까?
            "w"로 시작하는 문자열 ->u?
기능
대규모 프로그램을 개발하고 유지하는 가장 좋은 방법은 각각 관리하기 쉬운 작은 조각으로 구성하는 것입니다(때로는 분할 및 정복이라고도 하는 기술). 함수를 사용하면 프로그래머가 프로그램을 모듈화할 수 있습니다.
함수를 사용하면 복잡한 프로그램을 작은 블록으로 나눌 수 있으며, 각 블록은 쓰기, 읽기, 유지 관리하기가 더 쉽습니다. 우리는 이미 main 함수를 접했고 표준 라이브러리의 printf를 활용했습니다. 물론 우리만의 함수와 헤더 파일을 만들 수도 있습니다. 함수의 레이아웃은 다음과 같습니다.
반환 유형 함수 이름(필요한 경우 인수 목록)
            {
            지역 선언;
           진술;
           반환 값을 반환합니다.
            }
반환 유형이 생략되면 C는 int로 기본 설정됩니다. 반환 값은 선언된 유형이어야 합니다. 함수 내에서 선언된 모든 변수는 정의된 함수에서만 알 수 있다는 점에서 지역 변수라고 합니다.
일부 함수에는 함수와 함수를 호출한 모듈 간의 통신 방법을 제공하는 매개변수 목록이 있습니다. 매개변수는 또한 함수 외부에서 사용할 수 없다는 점에서 로컬 변수입니다. 지금까지 다룬 프로그램은 모두 함수인 main을 가지고 있습니다.
함수는 값을 반환하지 않고 단순히 작업을 수행할 수 있으며, 이 경우 다음과 같은 레이아웃을 따릅니다.
void 함수 이름(필요한 경우 인수 목록)
            {
            지역 선언;
          진술;
            }
인수는 항상 C 함수 호출에서 값으로 전달됩니다. 즉, 인수 값의 로컬 복사본이 루틴에 전달됩니다. 함수 내부에서 인수에 대한 모든 변경 사항은 인수의 로컬 복사본에만 적용됩니다.
인수 목록에서 인수를 변경하거나 정의하려면 이 인수를 주소로 전달해야 합니다. 함수가 해당 인수의 값을 변경하지 않는 경우 일반 변수를 사용합니다. 함수가 해당 인수의 값을 변경하는 경우 포인터를 사용해야 합니다.
예를 통해 알아보도록 하겠습니다.
               #include <stdio.h>
             void 교환(int *a, int *b)
            {
            int 온도;
            온도 = *a;
            *a = *b;
            *b = 온도;
            printf("함수 교환에서: ");
            printf("a = %d, b = %d\n", *a, *b);
            }
            void 메인()
            {
            int a, b;
            a = 5;
            b = 7;
           printf("main에서: a = %d, b = %d\n", a, b);
           교환(&a, &b);
           printf("main으로 돌아가기: ");
           printf("a = %d, b = %d\n", a, b);
            }
그리고 이 프로그램의 출력은 다음과 같이 표시됩니다.
              메인에서: a = 5, b = 7
              함수 교환에서: a = 7, b = 5
              메인으로 돌아가서: a = 7, b = 5
다른 예를 살펴보겠습니다. 다음 예는 1과 10 사이의 숫자의 제곱을 쓰는 square라는 함수를 사용합니다.
                #include <stdio.h>
             int square(int x); /* 함수 프로토타입 */
             int 메인()
            {
            int 카운터;
             카운터=1; 카운터<=10; 카운터++)
             printf("%d의 제곱은 %d입니다\n", counter, square(counter));
            0을 반환합니다.
            }
          /* 'square' 함수 정의 */
            int 제곱(int x)
            {
            x * x를 반환합니다.
            }
이 프로그램의 출력은 다음과 같이 표시됩니다.
              1의 제곱은 1이다
            2의 제곱은 4입니다
            3의 제곱은 9입니다
            4의 제곱은 16입니다
            5의 제곱은 25입니다
            6의 제곱은 36입니다
            7의 제곱은 49입니다
            8의 제곱은 64입니다
            9의 제곱은 81입니다
            10의 제곱은 100이다
함수 프로토타입 square는 정수 매개변수를 취하고 정수를 반환하는 함수를 선언합니다. 컴파일러가 메인 프로그램에서 square에 대한 함수 호출에 도달하면 함수 정의와 함수 호출을 확인할 수 있습니다.
프로그램이 함수 square를 호출하는 줄에 도달하면, 프로그램은 함수로 점프하여 메인 프로그램을 통한 경로를 재개하기 전에 해당 함수를 실행합니다. 반환 유형이 없는 프로그램은 void를 사용하여 선언해야 합니다. 따라서 함수에 대한 매개변수는 값으로 전달 또는 참조로 전달될 수 있습니다.
재귀 함수는 자기 자신을 호출하는 함수입니다. 그리고 이 과정을 재귀라고 합니다.
값 함수로 전달
이전 예제의 square 함수의 매개변수는 값으로 전달됩니다. 즉, 변수의 사본만 함수에 전달되었습니다. 값의 변경 사항은 호출 함수에 반영되지 않습니다.
다음 예제는 값 전달을 사용하고 전달된 매개변수의 값을 변경하는데, 이는 호출 함수에 영향을 미치지 않습니다. count_down 함수는 반환 유형이 없으므로 void로 선언되었습니다.
              #include <stdio.h>
            void 카운트다운(int x);
          int 메인()
            {
            int 카운터;
            카운터=1; 카운터<=10; 카운터++)
            카운트다운(카운터);
            0을 반환합니다.
            }
            void 카운트다운(int x)
            {
            int 카운터;
            카운터 = x; 카운터 > 0; 카운터--)
            {
            printf("%d ", x);
            엑스--;
            }
            putchar('\n');
            }
프로그램의 출력은 다음과 같이 표시됩니다.
                  1
                2 1
                3 2 1
                4 3 2 1
                5 4 3 2 1
                6 5 4 3 2 1
                7 6 5 4 3 2 1
                8 7 6 5 4 3 2 1
                9 8 7 6 5 4 3 2 1
                10 9 8 7 6 5 4 3 2 1
더 잘 이해하기 위해 또 다른 C Pass By Value 예제를 살펴보겠습니다. 다음 예제는 사용자가 입력한 1~30,000 사이의 숫자를 단어로 변환합니다.
                #include <stdio.h>
              void do_units(int num);
              void do_tens(int num);
              void do_teens(int num);
           int 메인()
            {
            int 숫자, 나머지;
            하다
            {
            printf("1에서 30,000 사이의 숫자를 입력하세요: ");
            scanf("%d", &num);
            } while (num < 1 || num > 30000);
            나머지 = 숫자;
            printf("%d개의 단어 = ", num);
            do_tens(잔류물/1000);
            만약 (숫자 >= 1000)
            printf("천 ");
            잔류물 %= 1000;
            do_units(잔류물/100);
            잔여물 >= 100인 경우
            {
            printf("백 ");
            }
            만약 (num > 100 && num%100 > 0)
            printf("그리고 ");
            잔류물 %=100;
            do_tens(잔류물);
            putchar('\n');
            0을 반환합니다.
            }
          void do_units(int num)
            {
            스위치(숫자)
            {
            사례 1:
            printf("하나 ");
            부서지다;
            사례 2:
            printf("두개 ");
            부서지다;
            사례 3:
            printf("세개 ");
            부서지다;
            사례 4:
            printf("네 ");
            부서지다;
            사례 5:
            printf("5 ");
            부서지다;
            사례 6:
            printf("6 ");
            부서지다;
            사례 7:
            printf("일곱");
            부서지다;
            사례 8:
            printf("8 ");
            부서지다;
            사례 9:
            printf("9 ");
            }
            }
            void do_tens(int num)
            {
            스위치(숫자/10)
            {
            사례 1:
            do_teens(숫자);
            부서지다;
            사례 2:
            printf("스무 ");
            부서지다;
            사례 3:
            printf("삼십 ");
            부서지다;
            사례 4:
            printf("사십 ");
            부서지다;
            사례 5:
            printf("오십 ");
            부서지다;
            사례 6:
            printf("육십 ");
            부서지다;
            사례 7:
            printf("일흔 ");
            부서지다;
            사례 8:
            printf("80 ");
            부서지다;
            사례 9:
            printf("90 ");
            }
            만약 (숫자/10 != 1)
            do_units(숫자%10);
            }
           void do_teens(int num)
            {
            스위치(숫자)
            {
            사례 10:
            printf("10 ");
            부서지다;
            사례 11:
            printf("열한개 ");
            부서지다;
            사례 12:
            printf("12개 ");
            부서지다;
            사례 13:
            printf("13 ");
            부서지다;
            사례 14:
            printf("열넷 ");
            부서지다;
            사례 15:
            printf("15 ");
            부서지다;
            사례 16:
            printf("열여섯 ");
            부서지다;
            사례 17:
            printf("열일곱 ");
            부서지다;
            사례 18:
            printf("18 ");
            부서지다;
            사례 19:
            printf("열아홉 ");
            }
            }
그리고 프로그램의 출력은 다음과 같습니다.
              1~30,000 사이의 숫자를 입력하세요: 12345
                12345를 단어로 환산 하면 1만 2,345 입니다.
참조에 의한 호출
함수를 참조로 호출하려면 변수 자체를 전달하는 대신 변수의 주소를 전달합니다. 변수의 주소는 & 연산자를 사용하여 가져올 수 있습니다. 다음은 실제 값 대신 변수의 주소를 전달하는 스왑 함수를 호출합니다.
&x, &y를 교환합니다.
역참조
지금 우리가 겪고 있는 문제는 swap 함수에 변수가 아닌 주소가 전달되었기 때문에 변수의 주소가 아닌 실제 값을 보고 변수를 바꿔야 하기 때문에 변수의 참조를 해제해야 한다는 것입니다.
C에서 역참조는 포인터(*) 표기법을 사용하여 달성됩니다. 간단히 말해서, 이는 각 변수를 사용하기 전에 *를 붙여서 변수의 주소가 아닌 값을 참조하도록 하는 것을 의미합니다. 다음 프로그램은 두 값을 교환하기 위한 참조 전달을 보여줍니다.
              #include <stdio.h>
            void 스왑(int *x, int *y);
            int 메인()
            {
            정수 x=6, y=10;
            printf("함수 교환 전에 x = %d이고 y =
            %d\n\n", x, y);
            &x, &y를 교환합니다.
            printf("함수 교환 후 x = %d, y =
            %d\n\n", x, y);
            0을 반환합니다.
            }
            void 스왑(int *x, int *y)
            {
            int 온도 = *x;
            *x = *y;
            *y = 온도;
            }
프로그램의 출력을 살펴보겠습니다.
함수 교환 전 x = 6, y = 10
                함수 교환 후 x = 10, y = 6
함수는 재귀적일 수 있습니다. 즉, 함수가 자신을 호출할 수 있습니다. 자신을 호출할 때마다 함수의 현재 상태가 스택에 푸시되어야 합니다. 스택 오버플로를 생성하기 쉽기 때문에 이 사실을 기억하는 것이 중요합니다. 즉, 스택에 더 이상 데이터를 넣을 공간이 없습니다.
다음 예는 재귀를 사용하여 숫자의 팩토리얼을 계산합니다. 팩토리얼은 1까지 자신보다 낮은 모든 정수로 곱한 숫자입니다. 예를 들어, 숫자 6의 팩토리얼은 다음과 같습니다.
팩토리얼 6 = 6 * 5 * 4 * 3 * 2 * 1
따라서 6의 팩토리얼은 720입니다. 위의 예에서 팩토리얼 6 = 6 * 팩토리얼 5임을 알 수 있습니다. 마찬가지로 팩토리얼 5 = 5 * 팩토리얼 4, 이런 식으로 계속됩니다.
팩토리얼 수를 계산하는 일반적인 규칙은 다음과 같습니다.
팩토리얼(n) = n * 팩토리얼(n-1)
위의 규칙은 n = 1일 때 종료됩니다. 1의 팩토리얼은 1이기 때문입니다. 예를 들어 더 잘 이해해 보겠습니다.
              #include <stdio.h>
            long int 팩토리얼(int num);
            int 메인()
            {
            정수 번호;
            긴 int f;
            printf("숫자를 입력하세요: ");
            scanf("%d", &num);
            f = 팩토리얼(숫자);
            printf("%d의 팩토리얼은 %ld입니다\n", num, f);
            0을 반환합니다.
            }
            long int 팩토리얼(int num)
            {
            만약 (num == 1)
            1을 반환합니다.
            또 다른
            num * factorial(num-1)을 반환합니다.
            }
이 프로그램을 실행한 결과를 살펴보겠습니다.
              숫자를 입력하세요: 7
              의 7 계승은 5040 입니다 .
C에서의 메모리 할당
C 컴파일러는 malloc.h에 정의된 메모리 할당 라이브러리를 가지고 있습니다. 메모리는 malloc 함수를 사용하여 예약되고 주소에 대한 포인터를 반환합니다. 필요한 메모리의 바이트 크기인 하나의 매개변수를 사용합니다.
다음 예제에서는 "hello world" 문자열에 대한 공간을 할당합니다.
ptr = (char *)malloc(strlen("Hello world") + 1);
문자열 종료 문자 '\0'을 고려하기 위해 추가 1바이트가 필요합니다. (char *)는 캐스트라고 하며 반환 유형이 char *가 되도록 강제합니다.
데이터 유형은 크기가 다르고 malloc은 공간을 바이트 단위로 반환하므로 이식성을 위해 할당할 크기를 지정할 때 sizeof 연산자를 사용하는 것이 좋습니다.
다음 예제에서는 문자열을 문자 배열 버퍼로 읽어들인 다음 필요한 정확한 양의 메모리를 할당하고 "ptr"이라는 변수에 복사합니다.
              #include <string.h>
            #include <malloc.h>
            int 메인()
            {
            char *ptr, 버퍼[80];
            printf("문자열을 입력하세요: ");
            버퍼를 가져옵니다.
            ptr = (char *)malloc((strlen(버퍼) + 1) *
            문자의 크기);
            strcpy(ptr, 버퍼);
            printf("입력하신 내용은 %s\n", ptr);
            0을 반환합니다.
            }
프로그램의 출력은 다음과 같습니다.
              문자열을 입력하세요: 인도가 최고입니다.
             입력하신 문자열은 다음과 같습니다: 인도가 최고입니다.
메모리 재할당
프로그래밍하는 동안 메모리를 재할당하고 싶을 때가 많습니다. 이는 realloc 함수로 수행됩니다. realloc 함수는 두 개의 매개변수를 취합니다. 크기를 조정하려는 메모리의 기본 주소와 예약하려는 공간의 양이며 기본 주소에 대한 포인터를 반환합니다.
msg라는 포인터에 대한 공간을 예약했고, 이미 차지하고 있는 공간과 다른 문자열의 길이만큼 공간을 재할당하려고 한다고 가정하면 다음을 사용할 수 있습니다.
msg = (char *)realloc(msg, (strlen(msg) + strlen(버퍼) + 1)*sizeof(char));
다음 프로그램은 malloc, realloc, free의 사용을 보여줍니다. 사용자는 연결된 일련의 문자열을 입력합니다. 빈 문자열이 입력되면 프로그램은 문자열 읽기를 중단합니다.
            #include <string.h>
            #include <malloc.h>
          int 메인()
            {
            char 버퍼[80], *msg;
            int 첫 번째 시간 = 0;
         하다
            {
            printf("\n문장을 입력하세요: ");
            버퍼를 가져옵니다.
           if (!firstTime)
            {
            메시지 = (char *)malloc((strlen(버퍼) + 1) *
            문자의 크기);
            strcpy(메시지, 버퍼);
            첫 번째 시간 = 1;
            }
           또 다른
            {
            메시지 = (char *)realloc(msg, (strlen(msg) +
            strlen(버퍼) + 1) * sizeof(문자));
            strcat(메시지, 버퍼);
            }
           메시지를 넣습니다.
            } while(strcmp(버퍼, ""));
           무료(메시지);
            0을 반환합니다.
            }
프로그램의 출력은 다음과 같습니다.
              문장을 입력하세요: 옛날 옛적에
              옛날 옛적에
              문장을 입력하세요: 왕이 있었습니다
              옛날 옛적에 왕이 있었습니다
              문장을 입력하세요: 왕이 있었습니다
              옛날 옛적에 왕이 있었습니다
              문장을 입력하세요:
              옛날 옛적에 왕이 있었습니다. 왕은
기억을 풀어주다
할당된 메모리를 다 사용했으면 메모리를 해제하는 것을 절대 잊지 마세요. 메모리를 해제하면 리소스가 해제되고 속도가 향상됩니다. 할당된 메모리를 해제하려면 free 함수를 사용하세요.
자유(ptr);
구조
C에는 기본 데이터 유형 외에도 서로 관련된 데이터 항목을 공통 이름으로 그룹화할 수 있는 구조 메커니즘이 있습니다. 이를 일반적으로 사용자 정의 유형이라고 합니다.
키워드 struct는 구조 정의를 시작하고 태그는 구조에 고유한 이름을 제공합니다. 구조에 추가된 데이터 유형과 변수 이름은 구조의 멤버입니다. 그 결과, 유형 지정자로 사용할 수 있는 구조 템플릿이 생성됩니다. 다음은 month 태그가 있는 구조입니다.
구조 월
            {
            문자 이름[10];
            문자 약어[4];
            int 일;
            };
구조체 유형은 일반적으로 typedef 문을 사용하여 파일 시작 부분 근처에 정의됩니다. typedef는 새로운 유형을 정의하고 이름을 지정하여 프로그램 전체에서 사용할 수 있도록 합니다. typedef는 일반적으로 파일에서 #define 및 #include 문 바로 뒤에 나타납니다.
typedef 키워드는 구조체의 이름으로 struct 키워드를 지정하는 대신 구조체를 참조하는 단어를 정의하는 데 사용할 수 있습니다. typedef의 이름을 대문자로 지정하는 것이 일반적입니다. 다음은 구조체 정의의 예입니다.
typedef 구조체 {
            char 이름[64];
            char course[128];
            국제 연령;
            년도;
            } 학생;
이는 새로운 유형의 학생 변수를 정의합니다. 학생 유형의 학생 변수는 다음과 같이 선언할 수 있습니다.
학생 st_rec;
이것이 int나 float를 선언하는 것과 얼마나 비슷한지 주목하세요. 변수 이름은 st_rec이고, name, course, age, year라는 멤버가 있습니다. 마찬가지로,
typedef 구조체 요소
            {
            문자 데이터;
            구조체 요소 *next;
            } 스택 요소;
            사용자 정의 유형 구조체 요소의 변수는 이제 다음과 같이 선언될 수 있습니다.
            스택요소 *스택;
다음 구조를 생각해 보세요.
구조 학생
            {
            char *이름;
            int 등급;
            };
구조체 student에 대한 포인터는 다음과 같이 정의할 수 있습니다.
구조체 학생 *hnc;
             구조체 포인터에 접근할 때, 도트 연산자 대신 멤버 포인터 연산자 ->가 사용됩니다. 구조체에 등급을 추가하려면,
             s.등급 = 50;
다음과 같이 구조에 등급을 지정할 수 있습니다.
s->등급 = 50;
기본 데이터 유형과 마찬가지로, 전달된 매개변수에 대한 함수에서 변경한 내용을 지속시키려면 참조로 전달해야 합니다(주소 전달). 메커니즘은 기본 데이터 유형과 정확히 동일합니다. 주소를 전달하고 포인터 표기법을 사용하여 변수를 참조합니다.
구조를 정의한 후에는 점 표기법을 사용하여 해당 인스턴스를 선언하고 멤버에 값을 할당할 수 있습니다. 다음 예는 월 구조의 사용을 보여줍니다.
                #include <stdio.h>
              #include <string.h>
              구조 월
              {
              문자 이름[10];
              char 약어[4];
              int 일;
              };
            int 메인()
            {
            구조체 월 m;
            strcpy(m.name, "1월");
            strcpy(m.약어, "1월");
            m.일 = 31;
            printf("%s는 %s로 축약되며 %d일 있습니다\n", m.name, m.abbreviation, m.days);
            0을 반환합니다.
            }
프로그램의 출력은 다음과 같습니다.
1월은 Jan으로 줄여서 부르며 31일이 있습니다.
모든 ANSI C 컴파일러는 멤버별 복사를 수행하여 한 구조를 다른 구조에 할당할 수 있도록 합니다. m1과 m2라는 월 구조가 있다면 다음과 같이 m1에서 m2로 값을 할당할 수 있습니다.
- 포인터 멤버를 사용한 구조.
- 구조가 초기화됩니다.
- 함수에 구조체 전달하기.
- 포인터와 구조체.
C에서 포인터 멤버를 포함하는 구조체
고정된 크기의 배열에 문자열을 보관하는 것은 메모리를 비효율적으로 사용하는 것입니다. 더 효율적인 방법은 포인터를 사용하는 것입니다. 포인터는 일반 포인터 정의에서 사용되는 것과 똑같은 방식으로 구조체에서 사용됩니다. 예를 들어 보겠습니다.
              #include <string.h>
            #include <malloc.h>
             구조 월
            {
            char *이름;
            char *약어;
            int 일;
            };
          int 메인()
            {
            구조체 월 m;
          m.name = (char *)malloc((strlen("1월")+1) *
            문자의 크기);
            strcpy(m.name, "1월");
           m.약어 = (char *)malloc((strlen("1월")+1) *
            문자의 크기);
            strcpy(m.약어, "1월");
           m.일 = 31;
          printf("%s는 %s로 축약되며 %d일이 있습니다\n",
            m.이름, m.약어, m.일);
         0을 반환합니다.
            }
프로그램의 출력은 다음과 같습니다.
1월은 Jan으로 줄여서 부르며 31일이 있습니다.
C의 구조체 초기화 프로그램
구조에 대한 초기 값 집합을 제공하기 위해, 선언문에 이니셜라이저를 추가할 수 있습니다. 월은 1에서 시작하지만, C에서는 배열이 0에서 시작하므로, 다음 예에서는 위치 0에 있는 추가 요소인 junk가 사용되었습니다.
              #include <stdio.h>
            #include <string.h>
             구조 월
            {
            char *이름;
            char *약어;
            int 일;
            } 월별_세부정보[] =
            {
            "쓰레기", "쓰레기", 0,
            "1월", "1월", 31,
            "2월", "2월", 28,
            "3월", "3월", 31,
            "4월", "4월", 30,
            "5월", "5월", 31,
            "6월", "6월", 30,
            "7월", "7월", 31,
            "8월", "8월", 31,
            "9월", "9월", 30,
            "10월", "10월", 31,
            "11월", "11월", 30,
            "12월", "12월", 31
            };
            int 메인()
            {
            int 카운터;
            카운터=1; 카운터<=12; 카운터++)
           printf("%s는 %s로 축약되며 %d일이 있습니다\n",
            월별 세부 정보[카운터].이름,
            월별 세부 정보[카운터].약어,
            월별_세부정보[카운터].일);
         0을 반환합니다.
            }
And the output will be displayed as follows:
              January is abbreviated as Jan and has 31 days
            February is abbreviated as Feb and has 28 days
            March is abbreviated as Mar and has 31 days
            April is abbreviated as Apr and has 30 days
            May is abbreviated as May and has 31 days
            June is abbreviated as Jun and has 30 days
            July is abbreviated as Jul and has 31 days
            August is abbreviated as Aug and has 31 days
            September is abbreviated as Sep and has 30 days
            October is abbreviated as Oct and has 31 days
            November is abbreviated as Nov and has 30 days
            December is abbreviated as Dec and has 31 days
Passing Structures to Functions in C
Structures may be passed as a parameter to a function, just as any of the basic data types. The following example uses a structure called date that has is passed to an isLeapYear function to determine if the year is a leap year.
Normally you would only pass the day value, but the whole structure is passed to illustrate passing structures to functions.
              #include <stdio.h>
            #include <string.h>
             struct month
            {
            char *name;
            char *abbreviation;
            int days;
            } month_details[] =
            {
            "Junk", "Junk", 0,
            "January", "Jan", 31,
            "February", "Feb", 28,
            "March", "Mar", 31,
            "April", "Apr", 30,
            "May", "May", 31,
            "June", "Jun", 30,
            "July", "Jul", 31,
            "August", "Aug", 31,
            "September", "Sep", 30,
            "October", "Oct", 31,
            "November", "Nov", 30,
            "December", "Dec", 31
            };
          struct date
            {
            int day;
            int month;
            int year;
            };
          int isLeapYear(struct date d);
          int main()
            {
            struct date d;
           printf("Enter the date (eg: 11/11/1980): ");
            scanf("%d/%d/%d", &d.day, &d.month, &d.year);
          printf("The date %d %s %d is ", d.day,
            month_details[d.month].name, d.year);
          if (isLeapYear(d) == 0)
           printf("not ");
            puts("a leap year");
           return 0;
            }
            int isLeapYear(struct date d)
            {
            if ((d.year % 4 == 0 && d.year % 100 != 0) ||
            d.year % 400 == 0)
            return 1;
            return 0;
            }
And the Execution of the program will be as follows:
              Enter the date (eg: 11/11/1980): 9/12/1980
            The date 9 December 1980 is a leap year
The following example dynamically allocates an array of structures to store students names and grade. The grades are then displayed back to the user in ascending order.
 #include <string.h>
              #include <malloc.h>
              struct student
            {
            char *name;
            int grade;
            };
            void swap(struct student *x, struct student *y);
            int main()
            {
            struct student *group;
            char buffer[80];
            int spurious;
            int inner, outer;
            int counter, numStudents;
          printf("How many students are there in the group: ");
          scanf("%d", &numStudents);
           group = (struct student *)malloc(numStudents *
           sizeof(struct student));
         for (counter=0; counter<numStudents; counter++)
            {
            spurious = getchar();
            printf("Enter the name of the student: ");
            gets(buffer);
            group[counter].name = (char *)malloc((strlen(buffer)+1) * sizeof(char));
            strcpy(group[counter].name, buffer);
            printf("Enter grade: ");
            scanf("%d", &group[counter].grade);
            }
          for (outer=0; outer<numStudents; outer++)
            for (inner=0; inner<outer; inner++)
            if (group[outer].grade <
            group[inner].grade)
          swap(&group[outer], &group[inner]);
          puts("The group in ascending order of grades ...");
            for (counter=0; counter<numStudents; counter++)
           printf("%s achieved Grade %d \n”,
            group[counter].name,
            group[counter].grade);
          return 0;
            }
         void swap(struct student *x, struct student *y)
            {
            struct student temp;
           temp.name = (char *)malloc((strlen(x->name)+1) *
            sizeof(char));
          strcpy(temp.name, x->name);
            temp.grade = x->grade;
            x->grade = y->grade;
            x->name = (char *)malloc((strlen(y->name)+1) *
            sizeof(char));
            strcpy(x->name, y->name);
            y->grade = temp.grade;
            y->name = (char *)malloc((strlen(temp.name)+1) *
            sizeof(char));
            strcpy(y->name, temp.name);
            }
The execution of the output will be as follows:
              How many students are there in the group: 4
             Enter the name of the student: Anuraaj
             Enter grade: 7
             Enter the name of the student: Honey
             Enter grade: 2
             Enter the name of the student: Meetushi
             Enter grade: 1
             Enter the name of the student: Deepti
             Enter grade: 4
             The group in ascending order of grades ...
             Meetushi가 1
              등급을 달성했습니다 . Honey가 2
              등급을 달성했습니다. Deepti가 4
              등급을 달성했습니다. Anuraaj가 7 등급을 달성했습니다 .
노동 조합
유니언은 서로 다른 유형으로 같은 데이터를 보거나, 서로 다른 이름으로 같은 데이터를 사용할 수 있는 방법을 제공합니다. 유니언은 구조체와 비슷합니다. 유니언은 구조체와 같은 방식으로 선언되고 사용됩니다.
유니언은 한 번에 하나의 멤버만 사용할 수 있다는 점에서 구조와 다릅니다. 그 이유는 간단합니다. 유니언의 모든 멤버는 같은 메모리 영역을 차지합니다. 그들은 서로 위에 놓여 있습니다.
유니언은 구조체와 같은 방식으로 정의되고 선언됩니다. 선언의 유일한 차이점은 키워드 union이 struct 대신 사용된다는 것입니다. char 변수와 정수 변수의 간단한 유니언을 정의하려면 다음과 같이 작성합니다.
노동조합 공유 {
            문자 c;
            안녕하세요.
            };
이 공유된 유니언은 문자 값 c 또는 정수 값 i를 보유할 수 있는 유니언의 인스턴스를 생성하는 데 사용할 수 있습니다. 이는 OR 조건입니다. 두 값을 모두 보유하는 구조와 달리 유니언은 한 번에 하나의 값만 보유할 수 있습니다.
공용체는 선언에서 초기화될 수 있습니다. 한 번에 하나의 멤버만 사용할 수 있고 하나만 초기화될 수 있기 때문입니다. 혼란을 피하기 위해 공용체의 첫 번째 멤버만 초기화될 수 있습니다. 다음 코드는 공유 공용체의 인스턴스가 선언되고 초기화되는 것을 보여줍니다.
유니언 공유 일반 변수 = {`@'};
generic_variable union은 구조체의 첫 번째 멤버가 초기화되는 것과 같은 방식으로 초기화되었습니다.
개별 유니언 멤버는 멤버 연산자(.)를 사용하여 구조 멤버를 사용할 수 있는 것과 같은 방식으로 사용할 수 있습니다. 그러나 유니언 멤버에 액세스하는 데는 중요한 차이가 있습니다.
한 번에 한 명의 노조원만 접근해야 합니다. 노조는 구성원을 서로 위에 저장하기 때문에 한 번에 한 명의 구성원만 접근하는 것이 중요합니다.
노동조합 키워드
유니온 태그 {
              노조 회원(들);
              /* 추가적인 문장을 여기에 넣을 수 있습니다 */
              }사례;
union 키워드는 union을 선언하는 데 사용됩니다. union은 단일 이름으로 그룹화된 하나 이상의 변수(union_members)의 컬렉션입니다. 또한 이러한 union 멤버 각각은 동일한 메모리 영역을 차지합니다.
키워드 union은 union 정의의 시작을 식별합니다. 그 뒤에 union에 주어진 이름인 태그가 옵니다. 태그 뒤에는 중괄호로 묶인 union 멤버가 옵니다.
인스턴스, 즉 유니온의 실제 선언도 정의할 수 있습니다. 인스턴스 없이 구조체를 정의하면 나중에 프로그램에서 구조체를 선언하는 데 사용할 수 있는 템플릿일 뿐입니다. 다음은 템플릿의 형식입니다.
유니온 태그 {
            노조 회원(들);
            /* 추가적인 문장을 여기에 넣을 수 있습니다 */
            };
템플릿을 사용하려면 다음 형식을 사용하면 됩니다: union tag instance;
이 형식을 사용하려면 먼저 주어진 태그로 공용체를 선언해야 합니다.
/* 태그라는 유니온 템플릿을 선언합니다. */
            유니온 태그 {
            정수 번호;
            차르 알프스;
            }
            /* 유니온 템플릿을 사용합니다 */
            유니온 태그 mixed_variable;
            /* 유니온과 인스턴스를 함께 선언합니다 */
         유니온 제네릭_타입_태그 {
            문자 c;
            안녕하세요.
            플로트 f;
            더블 d;
             } 일반적인;
          /* 유니온을 초기화합니다. */
            연합 날짜 태그 {
            char full_date[9];
            구조체 part_date_tag {
            char 월[2];
            char break_value1;
            문자 일[2];
            문자 break_value2;
            문자 연도[2];
            } 부분_날짜;
            }날짜 = {"80년 9월 12일"};
다음 예를 통해 이를 더 잘 이해해 보겠습니다.
#include <stdio.h>
               int 메인()
            {
            노동 조합
            {
            int value; /* 이것은 union의 첫 번째 부분입니다. */
             구조
            {
            char first; /* 이 두 값은 두 번째 부분입니다. */
            두 번째 문자;
            } 반;
            } 숫자;
           긴 색인;
           (인덱스 = 12 ; 인덱스 < 300000L ; 인덱스 += 35231L)
            {
            숫자.값 = 인덱스;
            printf("%8x %6x %6x\n", 숫자.값,
            숫자.반.첫째,
            숫자.반.초);
            }
           0을 반환합니다.
            }
그리고 프로그램의 출력은 다음과 같이 표시됩니다.
                     참조 0
                   89ab 팹 ff89
                   134a 4a 13
                   9ce9ffe9ff9c
                   2688 ff88 26
                   b027 27 ffb0
                   39c6 ffc6 39
                   c365 65 ffc3
                   4d04 4 4d
데이터 복구에 있어서 유니온의 실제적 활용
이제 union is 데이터 복구 프로그래밍의 실제적 사용을 살펴보겠습니다. 작은 예를 들어보겠습니다. 다음 프로그램은 플로피 디스크 드라이브(a:)에 대한 불량 섹터 검사 프로그램의 작은 모델이지만 불량 섹터 검사 소프트웨어의 완전한 모델은 아닙니다.
프로그램을 살펴보겠습니다.
#include<dos.h>
            #include<conio.h>
            int 메인()
            {
            int rp, 헤드, 트랙, 섹터, 상태;
            char *버프;
           union REGS in, out;
            구조체 SREGS s;
            영어: clrscr();
          /* 디스크 시스템을 재설정하여 디스크를 초기화합니다. */
            printf("\n 디스크 시스템을 재설정합니다....");
           rp=0;rp<=2;rp++에 대하여
            {
          in.h.ah = 0;
            in.h.dl = 0x00;
          int86(0x13,&입력,&출력);
            }
          printf("\n\n\n 이제 디스크의 불량 섹터를 테스트하고 있습니다....");
          /* 불량 섹터 스캔 */
            트랙=0;트랙<=79;트랙++)
            {
            for(머리=0;머리<=1;머리++)
            {
            섹터=1;섹터<=18;섹터++)
            {
            in.h.ah = 0x04;
            in.h.al = 1;
            in.h.dl = 0x00;
            in.h.ch = track;
            in.h.dh = head;
            in.h.cl = sector;
            in.x.bx = FP_OFF(buf);
            s.es = FP_SEG(buf);
        int86x(0x13,&in,&out,&s);
          if(out.x.cflag)
            {
          status=out.h.ah;
            printf("\n track:%d      Head:%d    Sector:%d  Status ==0x%X",track,head,sector,status);
            }
            }
            }
            }
            printf("\n\n\nDone");
            return 0;
            }
Now let us see what its output will look like if there are bad sector in the floppy disk:
Resetting the disk system....
Now Testing the Disk for Bad Sectors....
                     track:0 Head:0 Sector:4 Status ==0xA
                   track:0 Head:0 Sector:5 Status ==0xA
                   track:1 Head:0 Sector:4 Status ==0xA
                   track:1 Head:0 Sector:5 Status ==0xA
                   track:1 Head:0 Sector:6 Status ==0xA
                   track:1 Head:0 Sector:7 Status ==0xA
                   track:1 Head:0 Sector:8 Status ==0xA
                   track:1 Head:0 Sector:11 Status ==0xA
                   track:1 Head:0 Sector:12 Status ==0xA
                   track:1 Head:0 Sector:13 Status ==0xA
                   track:1 Head:0 Sector:14 Status ==0xA
                   track:1 Head:0 Sector:15 Status ==0xA
                   track:1 Head:0 Sector:16 Status ==0xA
                   track:1 Head:0 Sector:17 Status ==0xA
                   track:1 Head:0 Sector:18 Status ==0xA
                   track:1 Head:1 Sector:5 Status ==0xA
                   track:1 Head:1 Sector:6 Status ==0xA
                   track:1 Head:1 Sector:7 Status ==0xA
                   track:1 Head:1 Sector:8 Status ==0xA
                   track:1 Head:1 Sector:9 Status ==0xA
                   track:1 Head:1 Sector:10 Status ==0xA
                   track:1 Head:1 Sector:11 Status ==0xA
                   track:1 Head:1 Sector:12 Status ==0xA
                   track:1 Head:1 Sector:13 Status ==0xA
                   track:1 Head:1 Sector:14 Status ==0xA
                   track:1 Head:1 Sector:15 Status ==0xA
                   track:1 Head:1 Sector:16 Status ==0xA
                   track:1 Head:1 Sector:17 Status ==0xA
                   track:1 Head:1 Sector:18 Status ==0xA
                   track:2 Head:0 Sector:4 Status ==0xA
                   track:2 Head:0 Sector:5 Status ==0xA
                   track:14 Head:0 Sector:6 Status ==0xA
                    Done
It may be a little bit difficult to understand functions and interrupts used in this program to verify the disk for bad sectors and resetting the disk system etc. but you need not to worry, we are going to learn all these things in BIOS and interrupt programming sections later in the next coming chapters.
File Handling in C
File access in C is achieved by associating a stream with a file. C communicates with files using a new data type called a file pointer. This type is defined within stdio.h, and written as FILE *. A file pointer called output_file is declared in a statement like
FILE *output_file;
The File Modes of fopen Function
Your program must open a file before it can access it. This is done using the fopen function, which returns the required file pointer. If the file cannot be opened for any reason then the value NULL will be returned. You will usually use fopen as follows
if ((output_file = fopen("output_file", "w")) == NULL)
            fprintf(stderr, "Cannot open %s\n",
            "output_file");
fopen takes two arguments, both are strings, the first is the name of the file to be opened, the second is an access character, which is usually one of r, a or w etc. Files may be opened in a number of modes, as shown in the following table.
| File Modes |
| r |
Open a text file for reading. |
| w |
Create a text file for writing. If the file exists, it is overwritten. |
| a |
Open a text file in append mode. Text is added to the end of the file. |
| rb |
Open a binary file for reading. |
| wb |
Create a binary file for writing. If the file exists, it is overwritten. |
| ab |
Open a binary file in append mode. Data is added to the end of the file. |
| r+ |
Open a text file for reading and writing. |
| w+ |
Create a text file for reading and writing. If the file exists, it is overwritten. |
| a+ |
Open a text file for reading and writing at the end. |
| r+b or rb+ |
Open binary file for reading and writing. |
| w+b or wb+ |
Create a binary file for reading and writing. If the file exists, it is overwritten. |
| a+b or ab+ |
Open a text file for reading and writing at the end. |
The update modes are used with fseek, fsetpos and rewind functions. The fopen function returns a file pointer, or NULL if an error occurs.
The following example opens a file, tarun.txt in read-only mode. It is good programming practice to test the file exists.
 if ((in = fopen("tarun.txt", "r")) == NULL)
            {
            puts("Unable to open the file");
            return 0;
            }
Closing Files
Files are closed using the fclose function. The syntax is as follows:
fclose(in);
Reading Files
The feof function is used to test for the end of the file. The functions fgetc, fscanf, and fgets are used to read data from the file.
The following example lists the contents of a file on the screen, using fgetc to read the file a character at a time.
#include <stdio.h>
            int main()
            {
           FILE *in;
            int key;
           if ((in = fopen("tarun.txt", "r")) == NULL)
            {
          puts("Unable to open the file");
            return 0;
            }
          while (!feof(in))
            {
            key = fgetc(in);
         /* The last character read is the end of file marker so don't print it */
            if (!feof(in))
            putchar(key);
            }
            fclose(in);
            return 0;
            }
The fscanf function can be used to read different data types from the file as in the following example, providing the data in the file is in the format of the format string used with fscanf.
fscanf(in, "%d/%d/%d", &day, &month, &year);
The fgets function is used to read a number of characters from a file. stdin is the standard input file stream, and the fgets function can be used to control input.
Writing to Files
Data can be written to the file using fputc and fprintf. The following example uses the fgetc and fputc functions to make a copy of a text file.
#include <stdio.h>
            int main()
            {
            FILE *in, *out;
            int key;
           if ((in = fopen("tarun.txt", "r")) == NULL)
            {
            puts("Unable to open the file");
            return 0;
            }
          out = fopen("copy.txt", "w");
          while (!feof(in))
            {
            key = fgetc(in);
            if (!feof(in))
            fputc(key, out);
            }
          fclose(in);
          fclose(out);
         return 0;
            }
The fprintf function can be used to write formatted data to a file.
            fprintf(out, "Date: %02d/%02d/%02d\n",
             day, month, year);
Command Line Arguments with C
The ANSI C definition for declaring the main( ) function is either:
int main() or int main(int argc, char **argv)
The second version allows arguments to be passed from the command line. The parameter argc is an argument counter and contains the number of parameters passed from the command line. The parameter argv is the argument vector which is an array of pointers to strings that represent the actual parameters passed.
The following example allows any number of arguments to be passed from the command line and prints them out. argv[0] is the actual program. The program must be run from a command prompt.
#include <stdio.h>
            int main(int argc, char **argv)
            {
           int counter;
            puts("The arguments to the program are:");
          for (counter=0; counter<argc; counter++)
            puts(argv[counter]);
            return 0;
            }
          If the program name was count.c, it could be called as follows from the command line.
            count 3
            or
            count 7
            or
            count 192 etc.
The next example uses the file handling routines to copy a text file to a new file. For example the command line argument could be called as:
txtcpy one.txt two.txt
#include <stdio.h>
               int main(int argc, char **argv)
            {
            FILE *in, *out;
            int key;
          if (argc < 3)
            {
            puts("Usage: txtcpy source destination\n");
            puts("소스는 기존 파일이어야 합니다");
            puts("대상 파일이 존재하는 경우,
            덮어씀");
            0을 반환합니다.
            }
           if ((in = fopen(argv[1], "r")) == NULL)
            {
            puts("복사할 파일을 열 수 없습니다.");
            0을 반환합니다.
            }
           if ((out = fopen(argv[2], "w")) == NULL)
            {
            puts("출력 파일을 열 수 없습니다");
            0을 반환합니다.
            }
            while (!feof(in))
            {
            키 = fgetc(입력);
            if (!feof(in))
           fputc(키, 출력);
            }
          fclose(입력);
          fclose(아웃);
          0을 반환합니다.
            }
비트 단위 조작기
하드웨어 수준에서 데이터는 이진수로 표현됩니다. 숫자 59의 이진 표현은 111011입니다. 비트 0은 최하위 비트이고, 이 경우 비트 5는 최상위 비트입니다.
각 비트 세트는 비트 세트의 2제곱으로 계산됩니다. 비트 연산자를 사용하면 비트 수준에서 정수 변수를 조작할 수 있습니다. 다음은 숫자 59의 이진 표현을 보여줍니다.
| 숫자 59의 이진 표현 |
| 비트 5 4 3 2 1 0 |
| 2제곱 n 32 16 8 4 2 1 |
| 세트 1 1 1 0 1 1 |
3개의 비트를 사용하면 0부터 7까지의 숫자를 표현할 수 있습니다. 다음 표는 0부터 7까지의 숫자를 이진수로 나타낸 것입니다.
| 이진수 |
| 000 |
0 |
| 001 |
1 |
| 010 |
2 |
| 011 |
3 |
| 100 |
4 |
| 101 |
5 |
| 110 |
6 |
| 111 |
7 |
다음 표는 이진수를 조작하는 데 사용할 수 있는 비트 연산자를 나열한 것입니다.
| 이진수 |
| & |
비트 단위 AND |
| | |
비트 단위 OR |
| ^ |
비트 단위 배타적 OR |
| ~ |
비트 단위 보수 |
| << |
비트 단위 왼쪽으로 이동 |
| >> |
비트 단위 오른쪽으로 이동 |
비트 단위 AND
비트 AND는 두 비트가 모두 설정된 경우에만 True입니다. 다음 예는 숫자 23과 12에 대한 비트 AND의 결과를 보여줍니다.
| 10111 (23)
01100 (12) 및
____________________
00100 (결과 = 4) |
마스크 값을 사용하여 특정 비트가 설정되었는지 확인할 수 있습니다. 비트 1과 3이 설정되었는지 확인하려면 숫자를 10(비트 1과 3의 값)으로 마스크하고 결과를 마스크와 비교 테스트할 수 있습니다.
              #include <stdio.h>
            int 메인()
            {
            int num, mask = 10;
            printf("숫자를 입력하세요: ");
            scanf("%d", &num);
            if ((num & mask) == mask)
            puts("비트 1과 3이 설정되었습니다");
            또 다른
            puts("비트 1과 3이 설정되지 않았습니다");
            0을 반환합니다.
            }
비트 단위 OR
비트 OR은 두 비트 중 하나가 설정되면 참입니다. 다음은 숫자 23과 12에 대한 비트 OR의 결과를 보여줍니다.
| 10111 (23)
01100 (12) 또는
______________________
11111 (결과 = 31) |
마스크를 사용하여 비트 또는 비트가 설정되었는지 확인할 수 있습니다. 다음 예에서는 비트 2가 설정되었는지 확인합니다.
#include <stdio.h>
          int 메인()
            {
            int num, mask = 4;
           printf("숫자를 입력하세요: ");
           scanf("%d", &num);
           숫자 |= 마스크;
           printf("비트 2가 설정되었는지 확인한 후: %d\n", num);
           0을 반환합니다.
            }
비트 단위 배타적 OR
비트 단위 배타적 OR은 두 비트 중 하나가 설정되었지만 둘 다 설정되지 않은 경우 True입니다. 다음은 숫자 23과 12에 대한 비트 단위 배타적 OR의 결과를 보여줍니다.
| 10111 (23)
01100 (12) 배타적 논리합(XOR)
_____________________________ ______________
11011 (결과 = 27) |
배타적 OR에는 흥미로운 속성이 있습니다. 숫자 자체에 대한 배타적 OR을 수행하면 0은 0으로 유지되고 1은 둘 다 설정할 수 없으므로 0으로 설정되므로 숫자가 0으로 설정됩니다.
그 결과, 숫자를 다른 숫자와 배타적 OR한 다음, 그 결과를 다른 숫자와 다시 배타적 OR하면 그 결과가 원래 숫자가 됩니다. 위의 예에서 사용한 숫자로 이 작업을 시도할 수 있습니다.
              23 또는 12 = 27
            27 또는 12 = 23
            27 또는 23 = 12
이 기능은 암호화에 사용할 수 있습니다. 다음 프로그램은 사용자가 입력한 숫자의 속성을 설명하기 위해 23의 암호화 키를 사용합니다.
#include <stdio.h>
            int 메인()
            {
            int num, 키 = 23;
            printf("숫자를 입력하세요: ");
            scanf("%d", &num);
            숫자 ^= 키;
            printf("%d와 배타적 OR 연산은 %d\n", key, num);
            숫자 ^= 키;
            printf("%d와 배타적 OR 연산은 %d\n", key, num);
            0을 반환합니다.
            }
비트 단위 보완
비트 단위 보수는 비트를 켜거나 끄는 1의 보수 연산자입니다. 1이면 0으로 설정되고, 0이면 1로 설정됩니다.
#include <stdio.h>
            int 메인()
            {
            정수 숫자 = 0xFFFF;
          printf("%X의 보수는 %X입니다\n", num, ~num);
            0을 반환합니다.
            }
비트 단위 왼쪽으로 이동
Bitwise Shift Left 연산자는 숫자를 왼쪽으로 이동합니다. 숫자가 왼쪽으로 이동함에 따라 가장 중요한 비트가 손실되고, 비워진 가장 중요하지 않은 비트는 0입니다. 다음은 43의 이진 표현을 보여줍니다.
0101011 (10진수 43)
비트를 왼쪽으로 이동하면 가장 중요한 비트(이 경우 0)를 잃고 숫자는 가장 중요하지 않은 비트에 0으로 패딩됩니다. 다음은 결과 숫자입니다.
1010110 (10진수 86)
비트 단위 오른쪽으로 이동
Bitwise Shift Right 연산자는 숫자를 오른쪽으로 이동합니다. 비어 있는 가장 중요한 비트에 0이 도입되고 비어 있는 가장 중요하지 않은 비트는 손실됩니다. 다음은 숫자 43의 이진 표현을 보여줍니다.
0101011 (10진수 43)
비트를 오른쪽으로 이동하면 최하위 비트(이 경우 1)를 잃고 숫자는 최상위 비트에 0으로 패딩됩니다. 다음은 결과 숫자입니다.
0010101 (10진수 21)
다음 프로그램은 비트 단위 오른쪽 이동과 비트 단위 AND를 사용하여 숫자를 16비트 이진수로 표시합니다. 숫자는 16에서 0까지 연속적으로 오른쪽으로 이동하고 1과 비트 단위 AND하여 비트가 설정되었는지 확인합니다. 다른 방법은 비트 단위 OR 연산자와 함께 연속 마스크를 사용하는 것입니다.
#include <stdio.h>
                int 메인()
            {
            int 카운터, 숫자;
            printf("숫자를 입력하세요: ");
            scanf("%d", &num);
            printf("%d는 이진수입니다: ", num);
            (카운터=15; 카운터>=0; 카운터--)
            printf("%d", (num >> 카운터) & 1);
            putchar('\n');
            0을 반환합니다.
            }
2진수-10진수 변환을 위한 함수
다음에 주어진 두 함수는 2진수에서 10진수로, 10진수에서 2진수로 변환하는 함수입니다. 다음에 주어진 10진수를 해당 2진수로 변환하는 함수는 최대 32비트 2진수를 지원합니다. 요구 사항에 따라 이 함수나 이전에 주어진 프로그램을 사용하여 변환할 수 있습니다.
10진수에서 2진수로 변환하는 기능:
void 10진수를 2진수로(void)
              {
              int 입력 = 0;
              안녕하세요.
              int 카운트 = 0;
              int binary [32]; /* 32비트, 최대 32개 요소 */
              printf("변환할 10진수를 입력하세요
            이진 :");
            scanf("%d", &입력);
          하다
            {
            i = input%2; /* MOD 2를 사용해 1 또는 0을 얻습니다.*/
            binary[count] = i; /* 이진 배열에 요소 로드 */
            input = input/2; /* 입력을 2로 나누어 이진수로 감소 */
            count++; /* 필요한 요소의 수를 센다 */
            }while (입력 > 0);
             /* 반전하여 이진수를 출력합니다. */
            printf("이진 표현은 다음과 같습니다: ");
            하다
            {
            printf("%d", binary[count - 1]);
            세다--;
            } while (개수 > 0);
            printf("\n");
            }
2진수에서 10진수로 변환하는 기능:
다음 함수는 이진수를 해당 10진수로 변환합니다.
void 이진수에서 십진수로(void)
            {
            char 바이너리홀드[512];
            char *바이너리;
            int i=0;
            int 감소 = 0;
            정수 z;
            printf("이진수를 입력하세요.\n");
            printf("이진수는 0 또는 1만 가능합니다");
            printf("이진 항목 : ");
            이진 = gets(바이너리홀드);
            i=strlen(이진수);
            (z=0; z<i; ++z)에 대하여
            {
            dec=dec*2+(binary[z]=='1'? 1:0); /* Binary[z]가
            1과 같음,
            그 다음 1 또 0 */
            }
            printf("\n");
            printf("%s의 10진수 값은 %d입니다",
            이진수, 십진수);
            printf("\n");
            }
디버깅 및 테스트
구문 오류
구문은 문장의 요소의 문법, 구조 및 순서를 말합니다. 구문 오류는 문장을 세미콜론으로 끝내는 것을 잊는 것과 같이 규칙을 어길 때 발생합니다. 프로그램을 컴파일하면 컴파일러는 발생할 수 있는 구문 오류 목록을 생성합니다.
좋은 컴파일러는 오류에 대한 설명과 함께 목록을 출력하고 가능한 해결책을 제공할 수 있습니다. 오류를 수정하면 재컴파일 시 추가 오류가 표시될 수 있습니다. 그 이유는 이전 오류가 프로그램 구조를 변경하여 원래 컴파일 중에 추가 오류가 억제되었기 때문입니다.
마찬가지로, 한 번의 실수가 여러 오류를 초래할 수 있습니다. 올바르게 컴파일되고 실행되는 프로그램의 메인 함수 끝에 세미콜론을 넣어보세요. 다시 컴파일하면 엄청난 오류 목록이 나오는데, 그것은 단지 세미콜론이 잘못 배치된 것일 뿐입니다.
구문 오류뿐만 아니라 컴파일러는 경고도 발행할 수 있습니다. 경고는 오류가 아니지만 프로그램 실행 중에 문제를 일으킬 수 있습니다. 예를 들어, 배정밀도 부동 소수점 숫자를 단정밀도 부동 소수점 숫자에 할당하면 정밀도가 손실될 수 있습니다. 구문 오류는 아니지만 문제가 발생할 수 있습니다. 이 특정 예에서 변수를 적절한 데이터 유형으로 캐스팅하여 의도를 보여줄 수 있습니다.
x가 단정도 부동 소수점 숫자이고, y가 배정도 부동 소수점 숫자인 다음 예를 고려해 보겠습니다. y는 할당하는 동안 명시적으로 float로 캐스팅되어 컴파일러 경고가 제거됩니다.
x = (부동 소수점)y;
논리 오류
논리 오류는 논리에 오류가 있을 때 발생합니다. 예를 들어, 숫자가 4보다 작고 8보다 큰지 테스트할 수 있습니다. 이는 절대 사실이 될 수 없지만 구문적으로 올바르면 프로그램이 성공적으로 컴파일됩니다. 다음 예를 고려하세요.
              만약 (x < 4 && x > 8)
             puts("절대 일어나지 않을 거야!");
구문은 올바르므로 프로그램은 컴파일되지만, puts 문은 인쇄되지 않습니다. 왜냐하면 x의 값이 동시에 4보다 작으면서도 8보다 클 수 없기 때문입니다.
대부분의 논리 오류는 프로그램의 초기 테스트를 통해 발견됩니다. 예상대로 동작하지 않으면 논리 문장을 더 자세히 검사하여 수정합니다. 이는 명백한 논리 오류에만 해당합니다. 프로그램이 클수록, 프로그램을 통과하는 경로가 많을수록 프로그램이 예상대로 동작하는지 확인하기가 더 어려워집니다.
테스트
소프트웨어 개발 프로세스에서 오류는 개발 중 어느 단계에서나 주입될 수 있습니다. 이는 소프트웨어 개발의 초기 단계에 대한 검증 방법이 수동이기 때문입니다. 따라서 코딩 활동 중에 개발된 코드에는 코딩 활동 중에 도입된 오류 외에도 일부 요구 사항 오류와 설계 오류가 있을 가능성이 높습니다. 테스트 중에 테스트할 프로그램은 일련의 테스트 케이스로 실행되고 테스트 케이스에 대한 프로그램의 출력은 프로그래밍이 예상대로 수행되는지 확인하기 위해 평가됩니다.
따라서 테스팅은 기존 조건과 필요한 조건(즉, 버그)의 차이를 감지하고 소프트웨어 항목의 기능을 평가하기 위해 소프트웨어 항목을 분석하는 프로세스입니다. 따라서 테스팅은 오류를 찾기 위해 프로그램을 분석하는 프로세스입니다.
일부 테스트 원칙
- 검사를 통해 결함이 없는지 확인할 수 없으며, 결함이 있는지 여부만 확인할 수 있습니다.
- 실수는 일찍 일어날수록 더 큰 대가를 치르게 됩니다.
- 오류가 늦게 감지될수록 비용이 더 많이 듭니다.
이제 몇 가지 테스트 기술에 대해 논의해 보겠습니다.
화이트 박스 테스트
화이트 박스 테스트는 프로그램을 통과하는 모든 경로를 가능한 모든 값으로 테스트하는 기술입니다. 이 접근 방식은 프로그램이 어떻게 동작해야 하는지에 대한 지식이 필요합니다. 예를 들어, 프로그램이 1에서 50 사이의 정수 값을 허용하면 화이트 박스 테스트는 모든 50개 값으로 프로그램을 테스트하여 각각에 대해 올바른지 확인한 다음 정수가 취할 수 있는 다른 모든 가능한 값을 테스트하여 예상대로 동작하는지 테스트합니다. 일반적인 프로그램에 있을 수 있는 데이터 항목 수를 고려할 때 가능한 순열로 인해 대규모 프로그램의 경우 화이트 박스 테스트가 매우 어렵습니다.
화이트 박스 테스트는 대규모 프로그램의 안전에 중요한 기능에 적용할 수 있으며, 나머지 대부분은 아래에서 설명하는 블랙 박스 테스트를 사용하여 테스트합니다. 순열의 수 때문에 화이트 박스 테스트는 일반적으로 테스트 하네스를 사용하여 수행되며, 여기서 값 범위는 특수 프로그램을 통해 프로그램에 빠르게 공급되어 예상되는 동작에 대한 예외를 로깅합니다. 화이트 박스 테스트는 때때로 구조적, 명확한 또는 오픈 박스 테스트라고도 합니다.
블랙박스 테스팅
블랙박스 테스트는 화이트박스 테스트와 비슷하지만, 가능한 모든 값을 테스트하는 대신 선택된 값을 테스트합니다. 이 유형의 테스트에서 테스터는 입력과 예상 결과가 무엇인지 알고 있지만 프로그램이 어떻게 그 결과에 도달했는지는 반드시 알 수는 없습니다. 블랙박스 테스트는 때때로 기능 테스트라고도 합니다.
블랙박스 테스팅을 위한 테스트 케이스는 일반적으로 프로그램 사양이 완성된 직후에 개발됩니다. 테스트 케이스는 동등성 클래스를 기반으로 합니다.
동등 클래스
각 입력에 대해 동등 클래스는 유효한 상태와 유효하지 않은 상태를 정의합니다. 동등 클래스를 정의할 때 일반적으로 계획해야 할 세 가지 시나리오가 있습니다.
입력 데이터에 범위나 특정 값이 지정되면, 하나의 유효한 상태와 두 개의 유효하지 않은 상태가 정의됩니다. 예를 들어, 숫자가 1과 20 사이여야 하는 경우, 유효한 상태는 1과 20 사이가 되고, 1보다 작은 값에 대해서는 유효하지 않은 상태가 되고, 20보다 큰 값에 대해서는 유효하지 않은 상태가 됩니다.
입력 데이터에서 범위나 특정 값이 제외된 경우, 두 개의 유효한 상태와 하나의 유효하지 않은 상태가 정의됩니다. 예를 들어, 숫자가 1과 20 사이에 있으면 안 되는 경우 유효한 상태는 1보다 작고 20보다 큰 값이 되고, 유효하지 않은 상태는 1과 20 사이가 됩니다.
입력이 부울 값을 지정하는 경우 두 가지 상태, 즉 유효한 상태 하나와 유효하지 않은 상태 하나만 있습니다.
경계값 분석
경계값 분석은 입력 데이터의 경계에 있는 값만 고려합니다. 예를 들어, 1에서 20까지의 숫자의 경우 테스트 케이스는 1, 20, 0, 21이 될 수 있습니다. 아이디어는 프로그램이 이러한 값으로 예상대로 작동하면 다른 값도 예상대로 작동한다는 것입니다.
다음 표는 정의하고자 하는 일반적인 경계에 대한 개요를 제공합니다.
| 테스트 범위 |
| 입력 유형 |
테스트 값 |
| 범위 |
- x[하한]-1
- x[하한]
- x[상한]
- x[상한]+1
|
| 부울 |
|
테스트 계획 개발
동치 클래스를 정의하고 각 클래스의 경계를 결정합니다. 클래스의 경계를 정의한 후 경계에서 허용되는 값과 허용되지 않는 값의 목록을 작성하고 예상되는 동작은 무엇인지 적어보세요. 그런 다음 테스터는 경계 값으로 프로그램을 실행하고 경계 값이 필요한 결과와 비교 테스트되었을 때 어떤 일이 발생했는지 나타낼 수 있습니다.
아래는 허용 가능한 값의 범위가 10~110인 입력 연령의 유효성을 검사하는 데 사용되는 일반적인 테스트 계획입니다.
| 동등 클래스 |
| 유효한 |
잘못된 |
| 10~110 사이 |
> 110 |
|
< 10 |
동등 클래스를 결정했으므로 이제 연령에 대한 검사 계획을 개발할 수 있습니다.
| 테스트 계획 |
| 값 |
상태 |
기대되는 결과 |
실제 결과 |
| 10 |
유효한 |
이름을 얻으려면 계속 실행하세요 |
|
| 110 |
유효한 |
이름을 얻으려면 계속 실행하세요 |
|
| 9 |
잘못된 |
나이를 다시 물어보세요 |
|
| 111 |
잘못된 |
나이를 다시 물어보세요 |
|
"실제 결과" 열은 테스트 중에 채워지므로 비워둡니다. 결과가 예상한 대로이면 해당 열을 검사합니다. 그렇지 않은 경우에는 무슨 일이 일어났는지 알려주는 코멘트를 입력해야 합니다.